Log into ameliaCARGO
Each Agent must use their own login - sharing of Agent logins is NOT permitted. Any discrepancies are the responsibility of the open/logged-in Agent. Users are responsible for protecting their password, and changing it when necessary or requested to do so.
Web Links:
Training - TBA
Live - TBA
Login Screen:

Dashboard Page (shown immediately after login):

Notice the links in the bottom right-hand corner of the Dashboard page. Click the Training Guide link to view a pop-up Training Guide (as shown below). All of the links to the left have an animated demonstration of the associated feature. Take some time to review any items that interest you.


Arrival Procedure
Check In-Flight Report
Before a flight arrives at your station, an operator should view the In-Flight Report to check what cargo is incoming.

On this screen:
Enter Flight Number (or leave it empty to see all inbound flights). A pick-list is also available.
Select Flight Date.
Select From (originating) Airport.
Click View Report or Print Report.
A sample of the In-Flight Report is shown below. All cargo manifested by the originating station is listed on the report. Incoming cargo is grouped by cargo destined for your station and cargo transiting through your station.

Arriving a Flight
Flights must be ‘arrived’ before incoming cargo can be accepted. To do this, go to Manage Import Flight -> Flight Arrival:

On this screen:
Enter Flight Number (or use the pick-list).
Select Flight Date.
Click the Search button.
Click the Arrive link (for the flight in question).
If successful, a status of ‘Arrived’ replaces the link (in the Action column).
- If you see a message (You cannot arrive this flight since it has cargo and needs to be departed from [AP code].), contact the originating station and get them to ‘depart’ the flight.


NOTE that you should confirm the arrival time when ‘arriving’ a flight - change this value if it’s incorrect.
Receive Shipment
Normally, the Receive Consignments screen will automatically display after Arriving a Flight (see previous section). If not, access it manually to receive a shipment - go to Manage Import Flight -> Receive Consignments:

On this screen:
Enter Flight Number (or use the pick-list).
Select Flight Date.
Click the Search button.
In the table of results, select cargo being received using the checkboxes.
Confirm number of pieces, weight, and location (can be typed in or selected from list).
Click the Receive button.
Click OK on the confirmation dialog.
- If successful, a message (X Consignment(s) successfully received.) confirms this.
TRF (Transfer Cargo):
This is cargo making a stop at your base, and that requires a transfer to a connecting flight. Here is the process to follow:
1. Receive everything (including TRF) from the arriving flight:


2. If the Originating Base assigned a Flight Number for the transfer, you must A. Transfer Flight, B. Confirm Allocation, and C. Manifest.
- If no Flight Number was assigned, Pre-Allocate, then Manifest.
A. 

Out-Flight Report (cargo going through your station on the same aircraft):
This shows you through cargo planned on board the aircraft at your station. Through Cargo is NOT visible on your local manifest, but it’s important to be aware of what remains on board before adding cargo to a flight.
Go to Manage Export Flight -> Out-Flight Report:


NOTE that a remark is inserted stating the cargo in question is staying on the flight.
Offload Transit Consignments
Use this to offload Transit consignments (loaded on a through flight).

On this screen:
- Enter Flight Number (or use the pick-list).
- Select Flight Date.
- Click the Search button.
Results are displayed like this:

From here, enter the actual pieces and weight to be offloaded (for each consignment), then select the checkbox in the first column, and click the Offload button. Consignments for which you do not select the checkbox are NOT offloaded (they remain on the flight).
Transfer Consignments
Use this to transfer Inbound consignments from an inbound flight to an outbound flight.

Amend Storage Locations
Use this to change the Storage Location for an Import consignment.
Manage Delivery
Consignments for Delivery
Collect Payment:
- Choose Payment Type from the listbox. (Use Non-Account for cash/credit card/debit card/cheque transactions.)

Choose Payment Method from the listbox:
Description - Visa, MasterCard, Amex, etc.
Amount - collected amount
- Click the green checkmark to confirm/complete.

Click the Deliver button to confirm.
- If successful, a confirmation message (Consignment Delivered Successfully!) is displayed, and the Invoice and Delivery Receipt are printed.
Transshipments
Definition and Responsibilities
A. Definition of Interline Transfer of Cargo:
This is when a shipment is brought by one airline to another. The air waybill provided by the transferring airline is the document used to facilitate continued movement of the shipment. Interline transfers of cargo will only take place if:
Both airlines are IATA (International Air Transport Association) members. OR
The airlines (yours and another) have a Cargo Interline Agreement between them.
At the place of transfer, a Transfer Manifest is provided by the transferring airline to the receiving airline.
B. Responsibility of the Transferring Airline:
Complete a transfer manifest.
Ensure the AWB Number, pieces, and labeled destination match.
It’s mandatory to indicate for shipments from non-secure bases that the “Shipment has been searched.”
It’s essential that the Transfer Manifest is signed by a representative of the receiving airline.
One (1) copy of the Transfer Manifest is sent to Finance. Another copy is kept in the Base Interline transfer file. The receiving carrier is given one (1) copy of the transfer manifest.
C. Responsibility of the Receiving Airline:
Note any damages or shortages on the Transfer Manifest - If this is not done, 100% liability goes to the receiving airline should any claims need to be paid out.
- Send one (1) copy of the Transfer Manifest to Finance - Attach a copy of the original air waybill and a copy of the ameliaCARGO air waybill. Retain another copy in the Base Interline transfer file, with a copy of the original AWB attached. Attach another copy of the original AWB to the Base copy created in ameliaCARGO.
Creation of a Transshipment TO an Interline Partner
Here is an example of a transshipment from your airline to another.
Step 1 - Click on Show Transhipment Options.

Step 2 - Enter required data.

On the left (Tranship From & Carrier), use the second pick-list to select your airline’s Carrier Code. Then use the first pick-list to populate the originating station (it should get automatically populated).
- On the right (Tranship To & Carrier), use the second pick-list to select the interline airline’s Carrier Code. Select Destination Airport, then use the first pick-list to populate the destination airport/station’s code.
Step 3 - Process shipment as Prepaid.

Process the shipment as PREPAID to the destination airport. Complete payment as you would any prepaid shipment. All charges MUST be displayed in full; otherwise, the shipment may be refused by the Interline Airline.
Creation of a Transshipment FROM an Interline Partner
Here is an example of a transshipment to your airline (from an interline partner).
Step 1 - Click on Show Transhipment Options.
Step 2 - Enter required data.

Select appropriate Origin Airport (ex: Whitehorse).
Use the pick-list to select appropriate interline carrier (ex: 4N).
Use the pick-list to populate airport code (Tranship From).
Use the pick-list to select Destination Airport.
Use the pick-list to select your airline’s carrier code (in Tranship To section).
Use the pick-list to populate airport code (Tranship To).
Step 3 - Payment
For this type of shipment, payment should always be prepaid to Third Party (Interline Carrier’s account):

Step 4 - Complete the Create New Consignment process.
Complete the consignment as you would any other. Do NOT shortcut entering data from the Interline AWB - Let the system generate the proper rate. Don’t be concerned with rates shown in the Interline AWB. Exception: If a delivery request is indicated, enter the appropriate amount in the Other Charges section.
Once the consignment is saved, you will see something like this. Charges in the top and bottom areas should match to the penny.

Click the Save Consignment button. You will see the Finish screen.
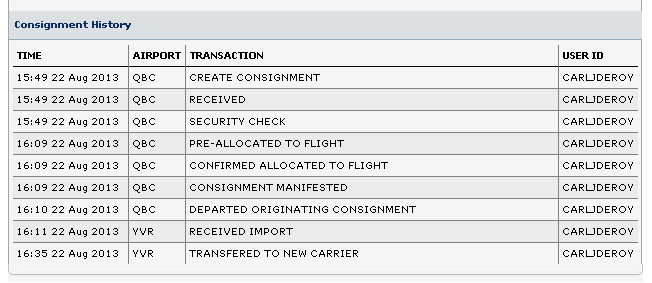
Transfer of a Transshipment to an Interline Partner
Here is an example of a transshipment to an interline cargo partner.
Step 1 - Arrive the flight. If everything is confirmed to be on-hand, receive ALL items.

Step 2 - Go to Manage Delivery -> Transhipment Transfer.

Step 3 - Enter the AWB # ONLY, and click Search.

Step 4 - In the search results, click the Consignment # (link).

Step 5 - Select the Delivery Date, and enter:
Time
Collector Name (Name of signing agent at receiving airline)
Delivery Reference No. (Use the Carrier Code.)
- Vehicle Registration No. (Optional, you may enter ‘x’.)

Then, click the Transfer button.
Step 6 - (optional) Attach the Transhipment Transfer Receipt to the base copy of the Interline Transfer Manifest. (Not required when Interline Transfer Manifests are used.)

Once the transfer is complete, the Shipment History will look like this:
END OF DOCUMENT