ameliaCARGO Admin Guide
- Nicolas Maillet (Unlicensed)
Introduction
The ameliaCARGO Airline Cargo Management System (ACMS) has many different types of users with differing operational requirements. This has lead to the development of specialist IT solutions that provide functionality for the respective areas of operations. ameliaCARGO is an Airline Cargo reservation, inventory, and revenue management system designed specifically for regional airlines.
This guide does NOT describe Airline Cargo operations - it is assumed the User has the relevant business and operational knowledge. This guide IS intended for users of the Import System. Separate User Guides are available for Exports, Imports, Accounts and Reports.
The Admin account type is intended for airline administrators. The Admin user has the highest level of control and authority on the system and can perform every role. As an Admin user, employees can access and manage all functions for all airports in the system. Operational and other User Types have restrictions that permit them to perform only certain functions at their specified airports.
Admin Functions
Login
Here is the Login Screen:

Check Admin Airport
When an Admin user logs into the system, it will locate that user at their standard airport - the Head Office. User Name, Local Airport, Currency settings are available in the upper-right corner of the screen. If an Admin wishes to perform actions at another airport, select the Change Settings link. You may then select the airport from a pick-list, and click Save or Cancel.

Manage Users
Select Manage Users from the menu. The system will display the full list of users currently in the system. Click on a column heading to reorder the list by that value. Click it again to see items in reverse order. 15 records are displayed per page - pagination controls (page numbers) are displayed above the list when required. The Action column has links for the available actions: Activate/De-Activate or Delete.

The Login ID is a link - click the Login ID of the user in question to modify/edit a user. Refer to Modify User.
You may also Activate or De-Activate users. Users must be active to login to the system. De-activated users cannot login, but may be reactivated by an Admin at any time. Users can be completely removed using the Delete link, as well. Refer to Delete User.
To add a new User, click the Add New User button (at the bottom of the list). Refer to Add New User.
Add New User
Click the Add New User button - the Add New User form is displayed. Enter the user information in the provided fields (Login Name, Password, Title, and Roles are required).

User Information:
- Login Name - accepts English characters ONLY (no special characters). This must be 8-25 characters, and the first character must be alphabetic. Numbers and the underscore can be used.
- Password - accepts English characters ONLY (no special characters). This must be 8-25 characters, and the first character must be alphabetic. Numbers and the underscore can be used.
- Employee Name (required)
- Employee Number (required)
- Title (required)
- Email (required)
- Local Airport - Select the local airport for the user. NOTE: Accounts, and Admin users should use the Head Office airport.
- GMT Time (Hours) - Set the offset from GMT Time (based on time zone) here. (If user’s time zone is GMT -3.5 hours, set this value to -3.5.)
- User Roles - Select one of these Roles:
- Accounts
- Administrators
- Call Center
- GSA Users
- Load and Revenue Managers
- Master Data Managers
- Operators
- Revenue and Load Managers
- Viewers
- Accounts
Once the required data is entered, click the Save button to create the new user. You may also click Cancel to abandon it and return to the previous screen.
Activate User
After adding a user, it will appear in the list, but with an inactive status. To activate the new user and allow it to login, click the Activate link on the Manage Users screen.
Modify User
To modify a User, click the Login ID (link) on the Manage Users screen. The User Profile screen is displayed:
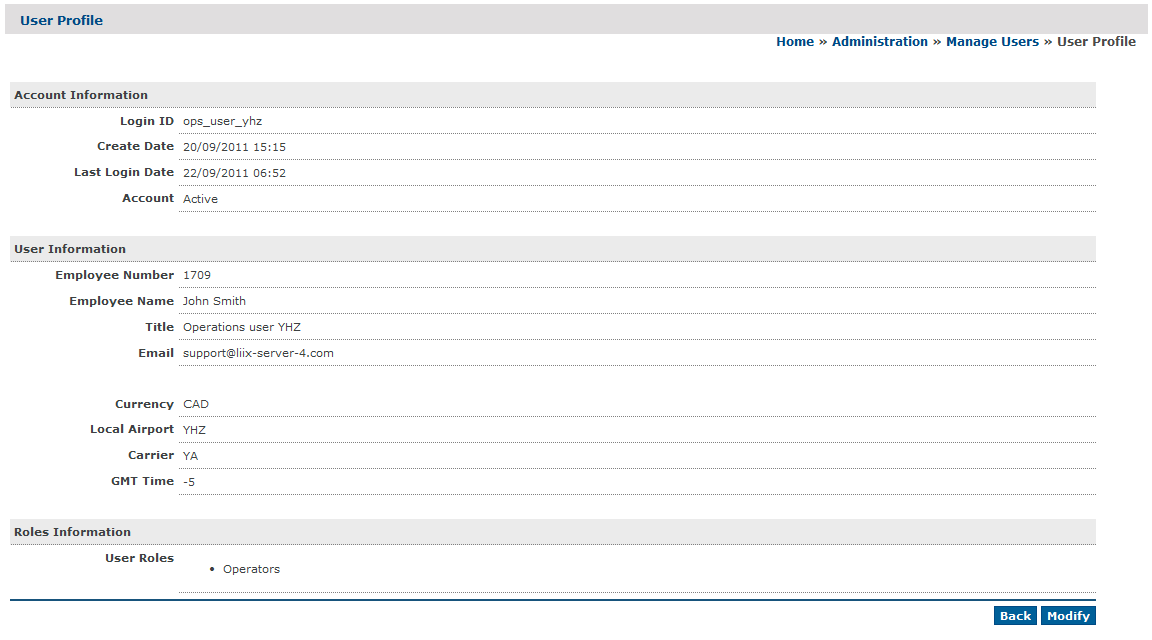
Click the Modify button to edit any of this data, other than Login ID and Password.

Once the required edits are done, click the Save button to save the changes. You may also click Cancel to abort and return to the previous screen.
Delete User
To delete a user, simply click the Delete link on the Manage Users screen. A confirmation dialog is displayed, where you may confirm the user’s deletion, or cancel and return to the previous screen.
Manage Customers
Select Manage Customers from the menu. This search screen is displayed:

Enter a Search Keyword (this can be Customer Account Number, Customer Name, Address, or Country) or leave it empty to see ALL customers, then click the Search button.
Matching customers (search results) are displayed like this:

Click on a column heading to reorder the list by that value. Click it again to see items in reverse order. 15 records are displayed per page - pagination controls (page numbers) are displayed above the list when required. The Action column has links for the available actions: View, Activate/De-Activate or Delete.
Click the View link of the customer in question to view or modify/edit a customer. Refer to View/Modify Customer.
You may also Activate or De-Activate customer. Customers must be active to login to the Public Cargo System. De-activated customers users cannot login, but remain available for Operational users and can be reactivated by an Admin at any time. Customers can be completely removed using the Delete link, as well. Refer to Delete Customer.
To add a new Customer, click the Add New Customer button (at the bottom of the list). Refer to Add New Customer.
Add New Customer
Click the Add New Customer button - the Add New Customer form is displayed:

Each customer is associated with a local airport. Select this using the Nearest Airport pick-list.
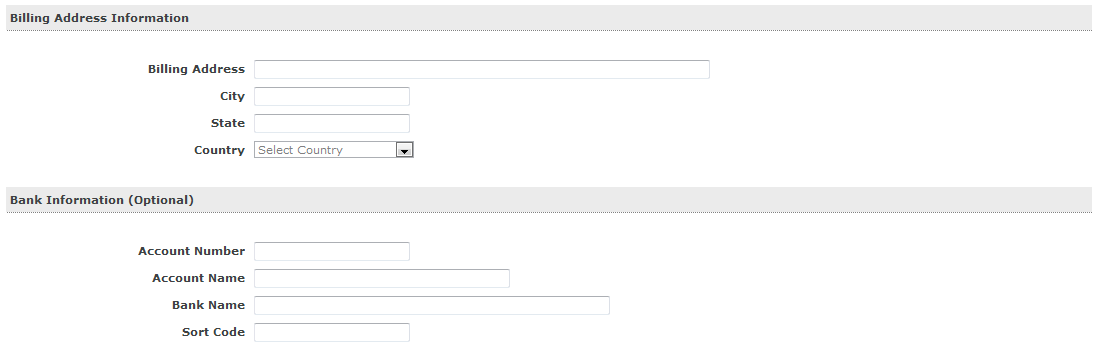
The Customer’s Billing Address is required. Bank Information is optional.

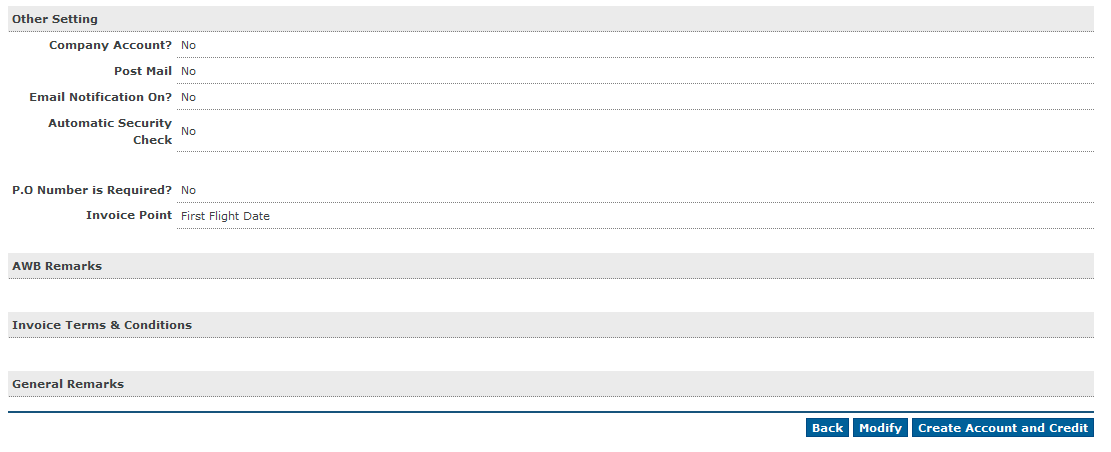
Other settings include:
- Company Account - Enable this if the customer account belongs to the airline. Used for Service Freight Consignments that can only be sent to/from a Company Account Customer.
- Post Mail - Enable this if the customer’s account is for post/mail. Used for Mail Consignments that can only be sent to/from a Mail Account Customer.
- Enable Email Notification - Enable this if the customer wishes to receive email notifications. Note that customers can change which notifications they receive after this is enabled.
- Automatic Security Check - Enable this to automatically set the Security checkbox to OK when creating a Consignment for this customer. NOTE: This can be overridden by the user when a Consignment is created.
- PO Number Required - Enable this if a PO (Purchase Order) # is required when a Consignment is shipped from this customer. PO # NOT required if this is unchecked.
- Invoice Point - This is the point at which the system will trigger the invoice for this Customer:
- Consignment Creation Date - Invoice customer at time of Consignment creation.
- First Flight Date - Invoice customer at time Consignments departs originating airport.
- Consignment Final Delivery Date - Invoice customer at time Consignment is delivered.
- Consignment Creation Date - Invoice customer at time of Consignment creation.
- AWB Remarks - Free-form text (max. 250 characters) - when this customer is the Shipper, this text will appear in the Handling Information box on the Print Waybill.
- Invoice Terms & Conditions - Free-form text (max. 8000 characters) that will appear on any invoice produced for this customer. This overrides the Standard Invoice Terms & Conditions.
- Remarks - Free-form text to provide private information and remarks for this customer.
Once all the required data is entered, click the Save button to save the new Customer. Once a Customer is added, you may perform these two additional steps.
1. Add Account Information (for Customers with a credit account):
In the list of customers on the Manage Customers screen, click the View link in the Action column.

The Customer’s information is displayed. At the bottom of the page, click the Create Account and Credit button:
In the Account and Credit Information section, enter the required info (Account Number, Credit Limit) and click Save.

2. Activate Public Access
If the Customer needs to access their consignment information online, this can be enabled by activating public access. They can receive automatic e-mail status messages, including:
- Consignment Creation - Print Waybill sent to Shipper
- Invoice Creation - Print Invoice sent to Customer (responsible for payment)
- Consignment Received at Final Delivery Airport - sent to Consignee
- Consignment Delivered at Final Delivery Airport - sent to Shipper

If no Login ID is displayed (and Activate link is disabled) for a Customer, the Admin must first create a Login ID. To do so, select the View link in the Action column, then click Create Login ID at the bottom of the page:

Enter the desired Login Name and Password in this section:

The click the Save button. Back on the Manage Customers screen, click the Activate link in the Action column. (An e-mail is sent to the Customer at the provided email address at this point.)
NOTE: Customers may also complete an online application form. If that is the case, the Customer should appear in the list with the Activate link enabled.
View/Modify Customer
To modify a Customer, click the View link (in the Action column) on the Manage Customers screen. The Customer Profile screen is displayed:

Login Information is used to access the Public Cargo System, and is created if the Customer Account is made active.
Login Information:
- Login ID - Account/Login name used by the Customer on the Public Site
- Login Create Date - date/time Login was created
- Last Login Date - date/time Customer last logged into the account
- Account - Status of Customer’s Public Login account (Active or Inactive)
General Information:
- Create Date - date/time Customer Account was created
- Last Update Date - date/time Customer Account was last updated
- Other fields are self-explanatory...


Click the Modify button to edit any of this data, or click Back to return to the previous screen.
Delete Customer
To delete a customer, simply click the Delete link on the Manage Customers screen. A confirmation dialog is displayed, where you may confirm the customer’s deletion, or cancel and return to the previous screen.
NOTE: A Customer cannot be deleted if any consignments exist for it.
Manage Airlines
This is where the list of Transhipment Airlines is managed. Operators can only receive Transhipment Consignments FROM, and deliver Transhipment Consignment TO, airlines in this list.
Select Manage Airlines from the menu. This search screen is displayed:

Enter a Search Keyword (this can be Airline Name, Address, Country, etc) or leave it empty to see ALL airlines, then click the Search button.
Matching airlines (search results) are displayed like this:

Click on a column heading to reorder the list by that value. Click it again to see items in reverse order. 15 records are displayed per page - pagination controls (page numbers) are displayed above the list when required. The Action column has links for the available actions: View or Delete.
Click the View link of the airline in question to view or modify/edit an airline. Refer to View/Modify Airline.
An airline can be completely removed using the Delete link. Refer to Delete Airline.
To add a new Airline, click the Add New Airline button (at the bottom of the list). Refer to Add New Airline.
Add New Airline
Click the Add New Airline button - the Add New Airline form is displayed:

General Information - self-explanatory
Billing Address Information - required
Bank Information - optional

Other Settings:
- Has Credit - Select this checkbox if the airline has credit. If not, shipments cannot be accepted.
- Currency Code - Select the default currency for the airline. Used for transactions/accounting (will be in the selected currency).
- Remarks - Free-form text used to provide private information and remarks for the Airline.
Once all the required data is entered, click the Save button to save the new Airline.
View/Modify Airline
To modify an Airline, click the View link (in the Action column) on the Manage Airlines screen. The Airline Details screen is displayed:


Click the Modify button to edit any of this data, or click Back to return to the previous screen.
Delete Airline
To delete an airline, simply click the Delete link on the Manage Airlines screen. A confirmation dialog is displayed, where you may confirm the airline’s deletion, or cancel and return to the previous screen.
NOTE: An Airline cannot be deleted if any consignments exist for it.
Manage Currencies
This is where the list of available Currencies, and the exchange rates in use, is managed. Operators can only accept consignments and issue invoices if the required Currency is in this list.
Select Manage Currencies from the menu. This search screen is displayed:

Enter a Search Keyword (this can be Currency Name or Currency Code) or leave it empty to see ALL currencies, then click the Search button.
Matching currencies (search results) are displayed like this:
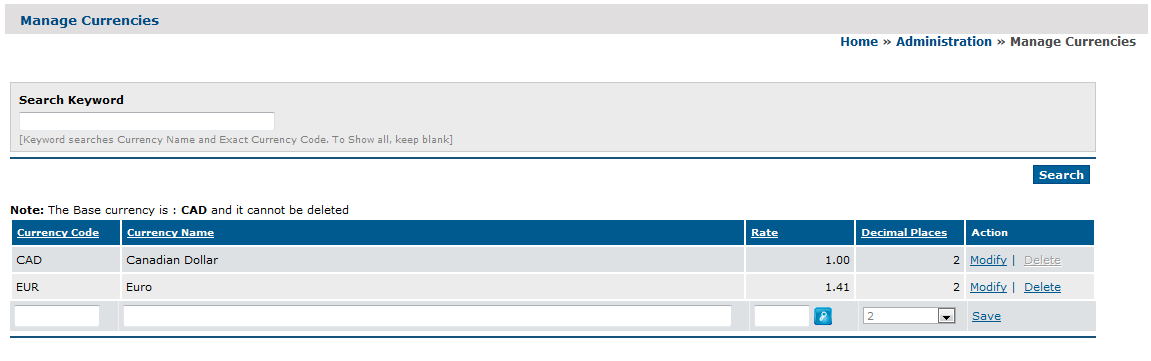
Click on a column heading to reorder the list by that value. Click it again to see items in reverse order. 15 records are displayed per page - pagination controls (page numbers) are displayed above the list when required. The Action column has links for the available actions: Modify or Delete.
Click the Modify link of the currency in question to modify/edit a currency. Refer to Modify Currency.
A currency can be completely removed using the Delete link. Refer to Delete Currency.
To add a new Currency, simply enter the required info in the provided fields (at the bottom of the table of results, shown in screenshot above), and click the Save link.
The following details are required:
- Currency Code - 3-letter international Currency Code
- Currency Name - Currency Name, as displayed to users.
- Rate - Exchange Rate for this currency (against the system’s standard/default Currency)
- Decimal Place - Number of decimal places used with this Currency
Modify Currency
To modify a Currency, click the Modify link (in the Action column) on the Manage Currencies screen. Fields will become enabled:

Click the Save link to save any changed data, or click Cancel to discard changes.
Delete Currency
To delete a Currency, simply click the Delete link on the Manage Currencies screen. A confirmation dialog is displayed, where you may confirm the currency’s deletion, or cancel and return to the previous screen.
NOTE: A Currency cannot be deleted if it’s used for any consignments or invoices in the system.
Manage Dangerous Goods
This is where you can manage Dangerous Goods accepted by your Airline.
Select Manage Dangerous Goods from the menu. This search screen is displayed:

Enter a Search Keyword (this can be DG Name or DG Code) or leave it empty to see ALL currencies, then click the Search button.
Matching Dangerous Goods (search results) are displayed like this:

Click on a column heading to reorder the list by that value. Click it again to see items in reverse order. 15 records are displayed per page - pagination controls (page numbers) are displayed above the list when required. The Action column has links for the available actions: Modify or Delete.
Click the Modify link of the DG in question to modify/edit a Dangerous Goods entry. Refer to Modify Dangerous Goods.
A DG can be completely removed using the Delete link. Refer to Delete Dangerous Goods.
To add a new Dangerous Goods entry, simply enter the required info in the provided fields (at the bottom of the table of results, shown in screenshot above), and click the Save link.
The following details are required:
- Dangerous Goods Code - 3-letter international Dangerous Goods Code
- Dangerous Goods Name - Dangerous Goods Name, as displayed to users.
Modify Dangerous Goods
To modify a DG, click the Modify link (in the Action column) on the Manage Dangerous Goods screen. Fields will become enabled:

Click the Save link to save any changed data, or click Cancel to discard changes.
Delete Dangerous Goods
To delete a DG, simply click the Delete link on the Manage Dangerous Goods screen. A confirmation dialog is displayed, where you may confirm the DG’s deletion, or cancel and return to the previous screen.
NOTE: A Dangerous Goods entry cannot be deleted if it’s used for any consignment in the system.
Manage Special Handling Codes
This is where you can manage Special Handling Codes accepted by your Airline.
Select Manage Special Handling Codes from the menu. This search screen is displayed:

Enter a Search Keyword (this can be SH Name or SH Code) or leave it empty to see ALL special handling codes, then click the Search button.
Matching Special Handling Codes (search results) are displayed like this:

Click on a column heading to reorder the list by that value. Click it again to see items in reverse order. 15 records are displayed per page - pagination controls (page numbers) are displayed above the list when required. The Action column has links for the available actions: Modify or Delete.
Click the Modify link of the Special Handling Code in question to modify/edit a Special Handling Code. Refer to Modify Special Handling Codes.
A Special Handling Code can be completely removed using the Delete link. Refer to Delete Special Handling Codes.
To add a new Special Handling Code, simply enter the required info in the provided fields (at the bottom of the table of results, shown in screenshot above), and click the Save link.
The following details are required:
- SH Code - 3-letter international Special Handling Code
- SH Code Description/Name - Special Handling Code, as displayed to users
Modify Special Handling Codes
To modify a Special Handling Code, click the Modify link (in the Action column) on the Manage Special Handling Codes screen. Fields will become enabled:

Click the Save link to save any changed data, or click Cancel to discard changes.
Delete Special Handling Codes
To delete a Special Handling Code, simply click the Delete link on the Manage Special Handling Codes screen. A confirmation dialog is displayed, where you may confirm the code’s deletion, or cancel and return to the previous screen.
NOTE: A Special Handling Code cannot be deleted if it’s used for any consignment in the system.
Manage Airports
This is where you manage Airports to which your Airline Operator flies/ships.
Select Manage Airports from the menu. This search screen is displayed:

Enter a Search Keyword (this can be Airport Name or Airport Code) or leave it empty to see ALL airports, then click the Search button.
Matching Airports (search results) are displayed like this:

Click on a column heading to reorder the list by that value. Click it again to see items in reverse order. 15 records are displayed per page - pagination controls (page numbers) are displayed above the list when required. The Action column has links for the available actions: View or Delete.
Click the View link of the Airport in question to view or modify/edit an airport. Refer to View/Modify Airport.
An airline can be completely removed using the Delete link. Refer to Delete Airport.
To add a new Airline, click the Add New Airline button (at the bottom of the list). Refer to Add New Airport.
Add New Airport
Click the Add New Airport button - the Add New Airport form is displayed:

The following details are required:
- Airport Code - 3-letter IATA airport code
- Airport Name - self-explanatory
- Listing Order - order in which the airport appears in the list in the system (incl. Public). The Head Office (Hub) Airport should be # 1.
- Office Type - usually Regional Office, but select Head Office for the HO/Hub Airport.
- Address and Contact info - self-explanatory, and displayed to public on Public Cargo site.

Other settings:
- Terms and Conditions - Free-form text to provide public info for Consignment acceptance, and transportation info from this Airport. Typically, this is the airline’s standard Terms and Conditions of Carriage; however, special clauses may exist at different airports - which are published here. These Terms and Conditions appear on the Public Cargo site.
- Delivery Details - Free-form text to provide public info for Consignment delivery to this Airport. Example: “Delivery opening hours 6am to 8pm daily. Photo ID and payment required.” Delivery Details appear on the Public Cargo site.

Other settings:
- Collection Details - Free-form text to provide public info for Consignment collection from this Airport. Example: “Collection opening hours 9am to 4pm, Monday to Friday. Photo ID required.” This info appears on the Public Cargo site.
- Hub Airport - Select the airport (from the pick-list) that is most commonly used as a transit point to/from this airport. This is typically your airline’s station when creating an outstation.
- Min. Transit Time - Minimum Transit Time (in minutes) for cargo transiting between flights at this airport.
- Currency - Currency associated with this airport
- Insurance Value - Insurance Value charge/fee per 100 units of local currency. Example: If local currency is CAD, and airline charges CAD 1.10 per CAD 100.00 of value insurance, enter ‘1.1’.
Once all the required data is entered, click the Save button to save the new Airport.
View/Modify Airport
To modify an Airport, click the View link (in the Action column) on the Manage Airports screen. The Airport Details screen is displayed:

Click the Modify button to edit any of this data, or click Back to return to the previous screen.
There are also links (Delivery Details, Collection Details, Terms & Conditions) at the bottom of the page to view the various T&Cs that are configured.
Delete Airport
To delete an airport, simply click the Delete link on the Manage Airports screen. A confirmation dialog is displayed, where you may confirm the airport’s deletion, or cancel and return to the previous screen.
NOTE: An Airport cannot be deleted if any consignments exist for it.
Manage Storage Locations
This is where you capture Storage Locations accepted by your Airline.
Select Manage Storage Locations from the menu. This search screen is displayed:

Enter a Search Keyword (this can be Storage Location Name or Storage Location Code) or leave it empty to see ALL special handling codes, then click the Search button.
Matching Storage Locations (search results) are displayed like this:

Click on a column heading to reorder the list by that value. Click it again to see items in reverse order. 15 records are displayed per page - pagination controls (page numbers) are displayed above the list when required. The Action column has links for the available actions: Modify or Delete.
Click the Modify link of the Storage Location in question to modify/edit a Storage Location. Refer to Modify Storage Locations.
A Storage Location can be completely removed using the Delete link. Refer to Delete Storage Locations.
To add a new Storage Location, simply enter the required info in the provided fields (at the bottom of the table of results, shown in screenshot above), and click the Save link.
The following details are required:
- Storage Location Airport - associated Airport (select from pick-list)
- Storage Location Name - Storage Location Name, as displayed to users.
Modify Storage Locations
To modify a Storage Location, click the Modify link (in the Action column) on the Manage Storage Locations screen. Fields will become enabled:

Click the Save link to save any changed data, or click Cancel to discard changes.
Delete Storage Locations
To delete a Storage Location, simply click the Delete link on the Manage Storage Locations screen. A confirmation dialog is displayed, where you may confirm the storage location’s deletion, or cancel and return to the previous screen.
NOTE: A Storage Location cannot be deleted if it’s used for any consignment in the system.
Manage Seasons
This is where you capture the Seasons used by your Airline.
Select Manage Seasons from the menu. This search screen is displayed:

Enter a Search Keyword (this can be Season Name or Season Code) or leave it empty to see ALL Seasons, then click the Search button.
Matching Seasons (search results) are displayed like this:

Click on a column heading to reorder the list by that value. Click it again to see items in reverse order. 15 records are displayed per page - pagination controls (page numbers) are displayed above the list when required. The Action column has links for the available actions: Modify or Delete.
Click the Modify link of the Season in question to modify/edit a Season. Refer to Modify Seasons.
A Season can be completely removed using the Delete link. Refer to Delete Seasons.
To add a new Season, simply enter the required info in the provided fields (at the bottom of the table of results, shown in screenshot above), and click the Save link.
The following details are required:
- Season Code - A code that represents the season (max. 4 chars)
- Season Description/Name - Season Name, as displayed to users.
Modify Seasons
To modify a Season, click the Modify link (in the Action column) on the Manage Seasons screen. Fields will become enabled:

Click the Save link to save any changed data, or click Cancel to discard changes.
Delete Seasons
To delete a Season, simply click the Delete link on the Manage Seasons screen. A confirmation dialog is displayed, where you may confirm the season’s deletion, or cancel and return to the previous screen.
NOTE: A Season cannot be deleted if it’s used for any consignment or invoice in the system.
Manage Rates Master
This is where you capture the (Master) Rates used by your Airline Operator to create Freight and Mail rates. A Rate Code must exist (in the Rates Master) before it can be used to create a Rate. The Rates Master contains the Rate Type and Rate Code, but not charge details (those are configured using the Manage Rates screen).
Select Manage Rates Master from the menu. This search screen is displayed:

Enter a Search Keyword (this can be Rates Master Name or Rates Master Code) or leave it empty to see ALL Rates Masters, then click the Search button.
Matching Rates Masters (search results) are displayed like this:

Click on a column heading to reorder the list by that value. Click it again to see items in reverse order. 15 records are displayed per page - pagination controls (page numbers) are displayed above the list when required. The Action column has links for the available actions: View or Delete.
Click the View link of the Rates Master in question to view or modify/edit a Rates Master. Refer to View/Modify Rates Master.
A Rates Master can be completely removed using the Delete link. Refer to Delete Rates Master.
To add a new Rates Master, click the Add New Rates Master button (at the bottom of the list). Refer to Add New Rates Master.
Add New Rates Master
Click the Add New Rates Master button - the Add New Rates Master form is displayed:

The following details are required:
- Rate Code - A code for the Rates Master (max. 4 chars)
- Description - A short description of the Rate
- Season Code - Select the applicable Season (from the pick-list).
- Rate Type - The type of rate:
- Fixed - The rate is a fixed charge (not calculated by weight or piece count).
- Weight - The rate is calculated based on the consignment’s weight.
- Pieces - The rate is calculated based on the count of pieces.
- Fixed - The rate is a fixed charge (not calculated by weight or piece count).
- Freight Rate - Yes/No - If Yes, charge is considered to be the principal cargo rate. If No, this rate is for an additional charge.
- Sales Tax % - Sales Tax % for this rate, if applicable. System will use this value as a default when creating Rates, but it can be changed (on the Manage Rates screen). If NOT applicable, enter 0 (zero).
- Fuel Surcharges % - Fuel Surcharges %, if applicable. System will use this value as a default when creating Rates, but it can be changed (on the Manage Rates screen). If NOT applicable, enter 0 (zero).
- Other Surcharges % - Other Surcharges %, if applicable. System will use this value as a default when creating Rates, but it can be changed (on the Manage Rates screen). If NOT applicable, enter 0 (zero).
- Mail Rate - Check this box if the Rate Code is for mail ONLY. Leave it unchecked for freight rates.
Once all the required data is entered, click the Save button to save the new Rates Master.
View/Modify Rates Master
To modify a Rates Master, click the View link (in the Action column) on the Manage Rates Master screen. The Rates Master Details screen is displayed:

Click the Save button to save any changed data, or click Cancel to return to the previous screen.
Certain Rate Codes cannot be edited - these include:
- COL - Used for Collection Charges
- DEL - Used for Delivery Charges
- DGS - Used for Dangerous Goods Charges
- DVC - Used for Insurance Charges
- OTH - Used as a general code for Other Charges
- STR - Used for Storage Charges
- SVC - Used for Service Rate Cargo
Delete Rates Master
To delete a Rates Master, simply click the Delete link on the Manage Rates Master screen. A confirmation dialog is displayed, where you may confirm the rates master’s deletion, or cancel and return to the previous screen.
NOTE: A Rates Master cannot be deleted if it’s used by any Rate in the system.
Certain Rate Codes cannot be deleted - these include:
- COL - Used for Collection Charges
- DEL - Used for Delivery Charges
- DGS - Used for Dangerous Goods Charges
- DVC - Used for Insurance Charges
- OTH - Used as a general code for Other Charges
- STR - Used for Storage Charges
- SVC - Used for Service Rate Cargo
Manage Rates
This is where you capture the Rates used by your Airline Operator to calculate charges. A Rate Code must exist (in the Rates Master) before it can be used to create a Rate. The Rates contain the actual charge details.
Select Manage Rates from the menu. This search screen is displayed:

Select Origin, Destination or Season from the pick-lists and/or enter a Search Keyword (this can be Rate Name or Rate Code) or leave it empty to see ALL Rates (NOT recommended), then click the Search button.
Matching Rates (search results) are displayed like this:

Click on a column heading to reorder the list by that value. Click it again to see items in reverse order. 15 records are displayed per page - pagination controls (page numbers) are displayed above the list when required. The Action column has links for the available actions: View or Delete.
Click the View link of the Rate in question to view or modify/edit a Rate. Refer to View/Modify Rates.
A Rate can be completely removed using the Delete link. Refer to Delete Rates.
To add a new Rate, click the Add New Rates button (at the bottom of the list). Refer to Add New Rates.
Add New Rates
Click the Add New Rates button - the Add New Rates form is displayed:

Then, click the button next to the Rate Code field to select it (from the available Rates Masters). This will populate some of the Rate details. You must complete or update the other data.

The following details are copied from the selected Rates Master, and cannot be changed:
- Rate Code
- Description
- Season Code
The following are copied from the selected Rates Master, and can be changed:
- Rate Type - The type of rate:
- Fixed - The rate is a fixed charge (not calculated by weight or piece count).
- Weight - The rate is calculated based on the consignment’s weight.
- Pieces - The rate is calculated based on the count of pieces.
- Fixed - The rate is a fixed charge (not calculated by weight or piece count).
- Freight Rate - Yes/No - If Yes, charge is considered to be the principal cargo rate. If No, this rate is for an additional charge.
- Sales Tax % - Sales Tax % for this rate, if applicable. System will use this value as a default when creating Rates, but it can be changed (on the Manage Rates screen). If NOT applicable, enter 0 (zero).
- Fuel Surcharges % - Fuel Surcharges %, if applicable. System will use this value as a default when creating Rates, but it can be changed (on the Manage Rates screen). If NOT applicable, enter 0 (zero).
- Other Surcharges % - Other Surcharges %, if applicable. System will use this value as a default when creating Rates, but it can be changed (on the Manage Rates screen). If NOT applicable, enter 0 (zero).
- Mail Rate - Check this box if the Rate Code is for mail ONLY. Leave it unchecked for freight rates.

Other Rate Information:
- Origin Airport - Select applicable Origin Airport (from pick-list). Required, and used to define airport-specific rates, including Collection, Delivery, Dangerous Goods, etc.
- Destination Airport - Select applicable Destination Airport (from pick-list). Optional, and primarily used for Freight Rates - Admin may define different dangerous goods per Route.
- Weight Range - Used to provide a weight range for Weight Calculation Rates (such as Freight Rates). Admin can configure Freight Rates for different weight ranges (ex: 0-5 kgs/lbs, 5-10 kgs/lbs). Unit of weight uses the system’s default.
- Display Rate - Freight Charge calculated and displayed on the AWB - this value (numeric ONLY) depends on the Rate Type (Fixed, Weight, Pieces). Example: Rate Type = Weight, a possible value is 2.5 (per unit of weight). Set Minimum Rate to ensure a minimum charge is applied - if that value is 40.00, the system will apply 2.5 per unit of weight for Consignments with a value over 40. For Fixed Rate consignments, the minimum rate does NOT apply.
- Display Minimum Rate - This value (numeric ONLY) is the minimum Freight Charge that will be displayed on the AWB. For Fixed Rate consignments, the minimum rate does NOT apply.
- Invoice Rate - Freight Charge calculated and invoiced - this value (numeric ONLY) depends on the Rate Type (Fixed, Weight, Pieces). Example: Rate Type = Weight, a possible value is 2.5 (per unit of weight). Set Minimum Rate to ensure a minimum charge is applied - if that value is 40.00, the system will apply 2.5 per unit of weight for Consignments with a value over 40. For Fixed Rate consignments, the minimum rate does NOT apply.
- Invoice Minimum Rate - This value (numeric ONLY) is the minimum Freight Charge that will be invoiced. For Fixed Rate consignments, the minimum rate does NOT apply.
- Currency - Select applicable Currency (from pick-list). Multiple rates can be set up in different currencies.
- Hide Rate - Check this box to hide the Rate (it won’t be shown to operational users, printed on the AWB, or viewable from the Consignments screen.) Hidden rates can only be viewed by Admin and Accounts users.
- Rate Priority - Select priority (from the pick-list) for the Rate. Priority levels are used in Waybill creation and Pre-Allocation to identify high-priority consignments for special handling. 1 is the highest priority level. 0 (zero) is not a priority level - used where no priority is appropriate.
- Rate Group - Select ‘Group A’ or ‘Group B’. Used to allocate limited space on the aircraft. Typically, Group A consignments are High Priority (and get special handling).
- Optional Other Charges - Check this box to make the Rate optional (NOT automatically included in Charges calculation). Examples: a. An Airport Handling Fee that is mandatory on all consignments from this airport would have this OFF. b. A repacking fee that is on a consignment by consignment basis would have this ON.
- Shipper Account - Select Customer account number (from pick-list). Used if a specific shipper has a special, negotiated fare, for example.
- Rate Note - Free-form text that describes the Rate, and how it differs from other Rates - example: higher priority, guaranteed delivery time, etc. This text is displayed to Public and Operational users.
Once all the required data is entered, click the Save button to save the new Rate.
View/Modify Single Rates
To modify a Rate, click the View link (in the Action column) on the Manage Rates screen. The Rates Details screen is displayed:

Click the Modify button to save any changed data, or click Back to return to the previous screen.
View/Modify Multiple Rates
To modify multiple Rates, click the Rate Bulk Update button on the Manage Rates screen.

The Rate Bulk Update screen is displayed:

Enter / Select the following:
- Origin Airport - Select applicable Origin Airport (from pick-list). Required, and used to define airport-specific rates, including Collection, Delivery, Dangerous Goods, etc. Use CTRL + left-click to select multiple items. Select NONE of the items if N/A.
- Destination Airport - Select applicable Destination Airport (from pick-list). Optional, and primarily used for Freight Rates - Admin may define different dangerous goods per Route. Use CTRL + left-click to select multiple items. Select NONE of the items if N/A.
- Rate Period - Enter the start and end dates for the rate validity period.
- Rate Code - Select the applicable Rate Code, and Season Code will also be populated.
- Customer Account - Select the applicable Customer Account Number(s) from the list. Rates can be set for a specific shipper - this can be used for special/negotiated fares. Use CTRL + left-click to select multiple items. Select NONE of the items if N/A.
- Update/Delete - Select the desired action.
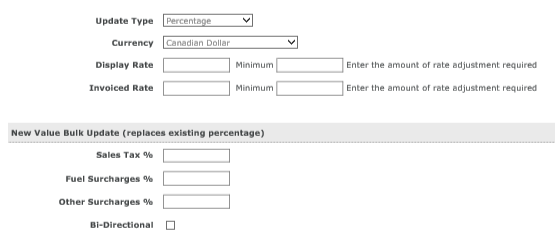
- Update Type - Select the appropriate Update Type.
- Currency - Select the appropriate Currency.
- Display Rate - Freight Charge calculated and displayed on the AWB - this value (numeric ONLY) depends on the Rate Type (Fixed, Weight, Pieces). Example: Rate Type = Weight, a possible value is 2.5 (per unit of weight). Set Minimum Rate to ensure a minimum charge is applied - if that value is 40.00, the system will apply 2.5 per unit of weight for Consignments with a value over 40. For Fixed Rate consignments, the minimum rate does NOT apply.
- Minimum (Display Rate) - This is the minimum freight charge that will be displayed on the waybill. For fixed rate consignments, this minimum does not apply.
- Invoice Rate - Freight Charge calculated and invoiced - this value (numeric ONLY) depends on the Rate Type (Fixed, Weight, Pieces). Example: Rate Type = Weight, a possible value is 2.5 (per unit of weight). Set Minimum Rate to ensure a minimum charge is applied - if that value is 40.00, the system will apply 2.5 per unit of weight for Consignments with a value over 40. For Fixed Rate consignments, the minimum rate does NOT apply.
- Minimum (Invoice Rate) - This is the minimum freight charge that will be invoiced to the customer. For fixed rate consignments, this minimum does not apply.
- Sales Tax - Enter the Sales Tax % (or fixed), if applicable.The system will use this as the standard when creating the Rate(s), but this can be overridden on the Manage Rates screen. Enter 0 (zero) if N/A.
- Fuel Surcharges - Enter the Fuel Surcharges % (or fixed), if applicable.The system will use this as the standard when creating the Rate(s), but this can be overridden on the Manage Rates screen. Enter 0 (zero) if N/A.
- Other Surcharges - Enter the Other Surcharges % (or fixed), if applicable.The system will use this as the standard when creating the Rate(s), but this can be overridden on the Manage Rates screen. Enter 0 (zero) if N/A.
- Bi-Directional - If Bi-Directional is checked, the Rate(s) apply to both directions.
Delete Rates
To delete a Rate, simply click the Delete link on the Manage Rates screen. A confirmation dialog is displayed, where you may confirm the rate’s deletion, or cancel and return to the previous screen.
Rates Upload (Bulk Update by File)
The CARGO system includes the ability to update cargo rates using an uploaded file. This can be used to add new rates, and update or delete existing rates. The process runs between 3 AM and 4 AM - any queued updates are actioned at that time. To upload a Bulk Update file, select the Rate Bulk Update by File button on the Manage Rates screen.

This process is designed for large-scale updates ONLY, and should only be performed by experienced system administrators. Smaller updates should be done individually using the Manage Rates screen.
File Rules:
- File MUST be in CSV format. (You may use Excel to open and save CSV files.)
- An example file is provided to show column names and order.
- Order of columns cannot be changed.
- Only 1 (one) file can be submitted per day.
- File cannot be deleted once submitted.
- Maximum file size is 2 Mb.
- Do NOT include column headings (on the first line).
- Each column must be present - use ONLY a comma if a field has no value.
- Do NOT add spaces before or after any values. Do NOT add any other/additional commas.
- All values should contain A-Z and 0-9 ONLY. No special characters are allowed.
- Dates must be in this format: YYYY-MM-DD (ex: 2016-01-31)
The data required in each column should be self-explanatory, but the descriptions given for the Add New Rates screen may be referenced.
Additional column info (applies to CSV file/upload ONLY):
- Rate - The charge that appears on the waybill.
- Invoice_rate - The rate invoiced to the customer.
- Rate_type - Must be F, W, A, or P.
- Season - Valid season (must exist in Manage Flight Configurations).
- Optional_other_charges - Must be Y or N. Y = charge is optional, N = charge is mandatory.
- Freight_or_handling_rate - Must be F or S. F = Freight, S = Service Charge.
- Hide_rate - Must be Y or N. Y = Hide rate, N = Do NOT hide rate.
- Rate_group - Must be A or B.
- Account_number - May be empty (NULL) or contain one or more (up to 20 per line) customer account #s. If multiple, separate them with a pipe / vertical line - |.
- Currency - IATA-standard currency code (ex: CAD, USD).
- Bi_directional - Must be Y or N. Y = Yes, N = No.
- Rate_cc_only_pp_only_both - Must be PP or CC or ‘Both’. Both = PP and CC.
- Promo_code - Must have a value - Use NO if promo code is not required.
- Points_awarded - Must have a value - Use 0 if not required.
- Min_Points - Must have a value - Use 0 if not required.
- Rate_priority - Must be a number from 1 to 6.
- New_expiry_date - Required to change the rate expiry date - see notes below. Leave empty (NULL) if no update is required.
- Update_delete_new - Must be N, U, or D. N = New, U = Update, D = Delete.
Notes:
If Update_delete_new = ‘New’, the system adds a new rate. There is NO check for existing rates.
If Update_delete_new = ‘Delete’, the system deletes the rate when the process runs. This is done by matching the following data, which must match the rate data in the system EXACTLY:
- ORIGIN_AIRPORT
- DESTINATION_AIRPORT
- SEASON
- RATE
- STARTING_WEIGHT
- END_WEIGHT
- CURRENCY_CODE
- ACCOUNT_NUMBER
- RATE_FROM_DATE
- RATE_TO_DATE
If Update_delete_new = ‘Update’, the system updates the rate when the process runs. This is done by matching the following data, which must match the rate data in the system EXACTLY:
- ORIGIN_AIRPORT
- DESTINATION_AIRPORT
- SEASON
- RATE
- STARTING_WEIGHT
- END_WEIGHT
- CURRENCY_CODE
- ACCOUNT_NUMBER
- RATE_FROM_DATE
- RATE_TO_DATE
If you wish to update only the rate expiry date of an existing rate, you must add the new expiry date in the new_expiry_date column. The complete and accurate rate details (fields listed above) must also be included - as all of these fields will be updated with the data provided.
Manage Flight Schedules
This is where you manage the Flight Schedules used by your Airline.
Select Manage Flights from the menu. This search screen is displayed:
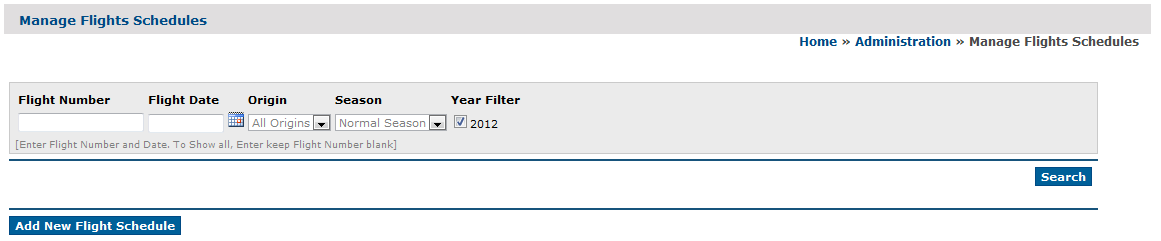
Enter Flight Number, Flight Date, and select Origin and/or Season, or leave these empty to see ALL Flights (NOT recommended), then click the Search button.
Matching Flights (search results) are displayed like this:

Click on a column heading to reorder the list by that value. Click it again to see items in reverse order. 15 records are displayed per page - pagination controls (page numbers) are displayed above the list when required.
Click the [Flight Number] link of the Flight in question to view or modify/edit a Flight. Refer to View/Modify Flights.
A Flight can be completely removed using the Delete button on the Flight Schedule Details screen. Refer to Delete Flights.
To add a new Flight, click the Add New Flight Schedule button (at the bottom of the list). Refer to Add New Flights.
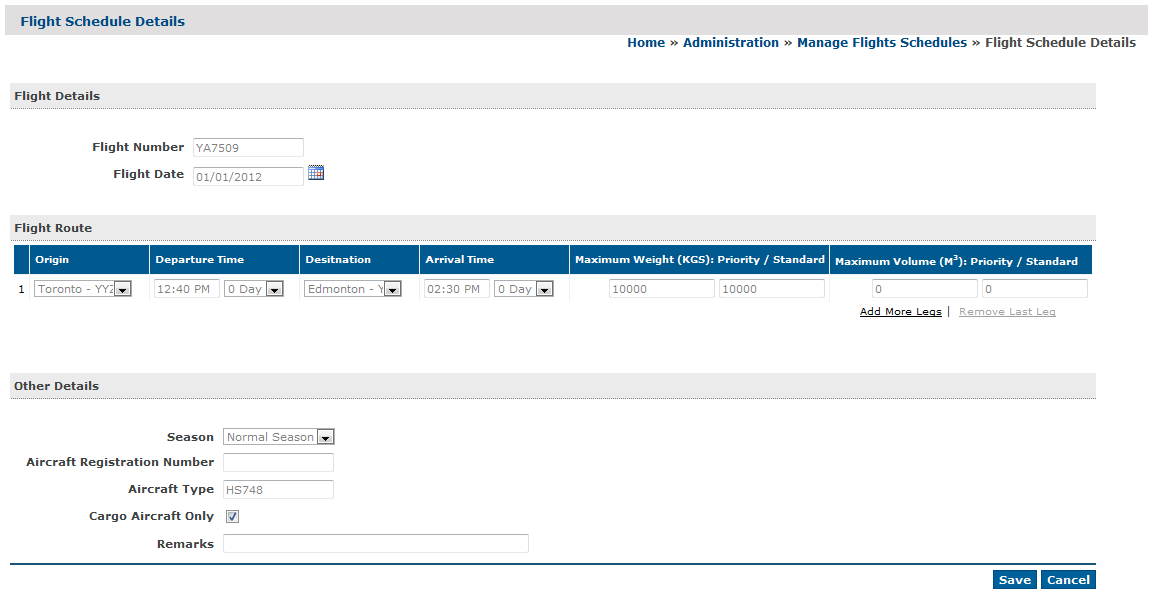
Add New Flights
Click the Add New Flight Schedule button - the Add New Flights form is displayed:
Then, click the button next to the Flight Code field to select it.
The following info is required:
- Flight Number
- Flight Date
- Flight Route
- Origin - Select flight Origin from pick-list.
- Departure Time - Scheduled departure time for the flight, +/- 1 day.
- Destination - Select flight Destination from pick-list.
- Arrival Time - Scheduled arrival time for the flight, +/- 1 day
- Max. Priority Weight - Maximum weight for Rate Group A cargo
- Max. Standard Weight - Maximum weight for Rate Group B cargo
- Max. Priority Volume - Maximum volume for Rate Group A cargo
- Max. Standard Volume - Maximum volume for Rate Group B cargo
- Origin - Select flight Origin from pick-list.
Once the first leg is added, click the Add More Legs link to add any other legs, and enter the same data for each leg (repeat as many times as necessary).

Other Flight Information:
- Season - Select from pick-list.
- Aircraft Registration Number
- Aircraft Type
- Cargo Aircraft Only - Check this box if the flight is on a freight-only, non-passenger aircraft. Leave it unchecked for passenger flights.
- Remarks - Free-form text for flight remarks.
Once all the required data is entered, click the Save button to save the new Flight.
View/Modify Flights
To modify a Flight, click the [Flight Number] link on the Manage Flight Schedules screen. The Flight Schedule Details screen is displayed:

Click the Modify button to change any of this data, or click Back to return to the previous screen.

The following changes are allowed:
- Aircraft Registration Number - anytime
- Aircraft Weights - anytime before departure of the flight leg
- Flight Legs - add allowed if following leg has not arrived
- Other changes - ONLY if NO cargo is allocated to the flight
A flight cannot be edited if it has departed.
Delete Flights
To delete a Flight, simply click the Delete button on the Flight Schedule Details screen (discussed in previous section). A confirmation dialog is displayed, where you may confirm the flight’s deletion, or cancel and return to the previous screen.
NOTE: A flight cannot be deleted if it has departed.
Manage Goods Master
This is where you capture frequently used Goods Descriptions.
Select Manage Goods Master from the menu. This search screen is displayed:

Enter a Search Keyword (Goods Description) or leave it empty to see ALL Goods Descriptions, then click the Search button.
Matching Goods Descriptions (search results) are displayed like this:

Click on a column heading to reorder the list by that value. Click it again to see items in reverse order. 15 records are displayed per page - pagination controls (page numbers) are displayed above the list when required. The Action column has links for the available actions: Modify or Delete.
Goods Descriptions can be completely removed using the Delete link.
To add a new Goods Description, simply enter the required info in the provided fields (at the bottom of the table of results, shown in screenshot above), and click the Save link.
Modify Goods Description
Select Manage Goods Master from the menu. The search screen is displayed.
Enter a Search Keyword (Goods Description) or leave it empty to see ALL Goods Descriptions, then click the Search button.
Matching Goods Descriptions (search results) are displayed like this:

Click the Modify link of the Goods Description in question to modify/edit it. Click the Save link to save any changes.
Delete Goods Description
To delete a Goods Description, simply click the Delete link on the Manage Goods Master screen. A confirmation dialog is displayed, where you may confirm the goods description’s deletion, or cancel and return to the previous screen.
Manage Rates Surcharge
This is where you capture frequently used Rates Surcharges.
Select Manage Rates Surcharges from the menu. This search screen is displayed:

Enter a Search Keyword (Description) or leave it empty to see ALL Rates Surcharges, then click the Search button.
Matching Rates Surcharges (search results) are displayed like this:

Click on a column heading to reorder the list by that value. Click it again to see items in reverse order. 15 records are displayed per page - pagination controls (page numbers) are displayed above the list when required. The Action column has links for the available actions: Modify or Delete.
Click the Modify link of the Rates Surcharge in question to modify/edit it. Refer to Modify Rates Surcharge.
A Rates Surcharge can be completely removed using the Delete link. Refer to Delete Rates Surcharge.
To add a new Rates Surcharge, simply enter the required info in the provided fields (at the bottom of the table of results, shown in screenshot above), and click the Save link.
Modify Rates Surcharge
To modify a Rates Surcharge, click the Modify link (in the Action column) on the Manage Rates Surcharge screen. Fields will become enabled:

Click the Save link to save any changed data, or click Cancel to discard changes.
Delete Rates Surcharge
To delete a Rates Surcharge, simply click the Delete link on the Manage Rates Surcharge screen. A confirmation dialog is displayed, where you may confirm the rates surcharge’s deletion, or cancel and return to the previous screen.
Manage Flight Configurations
This is where you capture Aircraft/Flight Configurations.
Select Manage Flight Configurations from the menu. This current configs are displayed:

Click on a column heading to reorder the list by that value. Click it again to see items in reverse order. 15 records are displayed per page - pagination controls (page numbers) are displayed above the list when required. The Action column has links for the available actions: Modify or Delete.
Click the Modify link of the Flight Configuration in question to modify/edit it. Refer to Modify Flight Configuration.
A Flight Configuration can be completely removed using the Delete link. Refer to Delete Flight Configuration.
To add a new Flight Configuration, simply enter the required info in the provided fields (at the bottom of the table of results, shown in screenshot above), and click the Save link.
The following details are required:
- Config Name - Must be unique.
- Aircraft Type - Must match aircraft used in Flight Schedules.
- Aircraft Reg Number - optional
- CAO - Yes if flight is Cargo ONLY (non-passenger).
- Season - Select from pick-list.
- Max. Priority Weight - Maximum weight for Rate Group A cargo
- Max. Standard Weight - Maximum weight for Rate Group B cargo
- Max. Priority Volume - Maximum volume for Rate Group A cargo
- Max. Standard Volume - Maximum volume for Rate Group B cargo
- Auto Flight Update - Yes if this config is used for Flight Schedule import.
Modify Flight Configurations
To modify a Flight Configuration, click the Modify link (in the Action column) on the Manage Flight Configurations screen. Fields will become enabled:

Click the Save link to save any changed data, or click Cancel to discard changes.
Delete Flight Configurations
To delete a Flight Configuration, simply click the Delete link on the Manage Flight Configurations screen. A confirmation dialog is displayed, where you may confirm the flight config’s deletion, or cancel and return to the previous screen.
Manage Flight Leg Distances
This is where you capture Flight Leg Distances.
Select Manage Flight Leg Distances from the menu. The current flight leg distances are displayed:

Click on a column heading to reorder the list by that value. Click it again to see items in reverse order. 15 records are displayed per page - pagination controls (page numbers) are displayed above the list when required. The Action column has links for the available actions: Modify or Delete.
Click the Modify link of the Flight Leg Distance in question to modify/edit it. Refer to Modify Flight Leg Distances.
A Flight Leg Distance can be completely removed using the Delete link. Refer to Delete Flight Leg Distances.
To add a new Flight Leg Distance, simply enter the required info in the provided fields (at the bottom of the table of results, shown in screenshot above), and click the Save link.
The following details are required:
- Airports Pair - The pair of airports/cities must be selected from the provided pick-lists. Once A->B is entered, the return/reverse route (B->A) does NOT have to be added (as the distance is the same.)
- Distance - Distance between the airport/city pair, in system-specified unit (Miles or Kilometers).
Modify Flight Leg Distances
To modify a Flight Leg Distance, click the Modify link (in the Action column) on the Manage Flight Leg Distances screen. Fields will become enabled:

Click the Save link to save any changed data, or click Cancel to discard changes.
Delete Flight Leg Distances
To delete a Flight Leg Distance, simply click the Delete link on the Manage Flight Leg Distances screen. A confirmation dialog is displayed, where you may confirm the distance’s deletion, or cancel and return to the previous screen.
Manage AWB Number Range
This is where you manage the range of AWB Numbers in use.
Select Manage AWB Number Range from the menu. The current ranges are displayed:

Click on a column heading to reorder the list by that value. Click it again to see items in reverse order. 15 records are displayed per page - pagination controls (page numbers) are displayed above the list when required. The Action column has links for the available actions: Activate/De-Activate, Modify or Delete.
You may Activate or De-Activate AWB Number Ranges using the link in the Action column (it will change depending on the range’s current status).
Click the Modify link of the AWB Number Range in question to modify/edit it. Refer to Modify AWB Number Range.
An AWB Number Range can be completely removed using the Delete link. Refer to Delete AWB Number Range.
To add a new AWB Number Range, simply enter the required info in the provided fields (at the bottom of the table of results, shown in screenshot above), and click the Save link.
The following details are required:
- Priority - Priority from 1 to 5, with 1 being the highest priority.
- Range Start - The first number (7 digits) in the range
- Range End - The last number (7 digits) in the range
- Customer - Select from pick-list or click the Not Applicable button.
Modify AWB Number Range
To modify an AWB Number Range, click the Modify link (in the Action column) on the Manage AWB Number Ranges screen. Fields will become enabled:

NOTE: You cannot edit an Active range.
Click the Save link to save any changed data, or click Cancel to discard changes.
Delete AWB Number Range
To delete an AWB Number Range, simply click the Delete link on the Manage AWB Number Ranges screen. A confirmation dialog is displayed, where you may confirm the range’s deletion, or cancel and return to the previous screen.
Update MOTD (Message of the Day)
This is where you can post a message for all users (displays on their dashboard).
Select Update MOTD from the menu. This screen, with the current MOTD, is displayed:

To change the MOTD, click the Modify button. This screen appears:

Make the required changes, and click the Save button.
Manage Performance Alerts
This is where you manage Performance Alerts.
Select Manage Performance Alerts from the menu. The current alerts are displayed:

Click on a column heading to reorder the list by that value. Click it again to see items in reverse order. 15 records are displayed per page - pagination controls (page numbers) are displayed above the list when required. The Action column has links for the available actions: Modify or Delete.
Click the Modify link of the Performance Alert in question to modify/edit it. Refer to Modify Performance Alert.
A Performance Alert can be completely removed using the Delete link. Refer to Delete Performance Alert.
To add a new Performance Alert, simply enter the required info in the provided fields (at the bottom of the table of results, shown in screenshot above), and click the Save link.
The following details are required:
- Carrier Code - Your airline’s code
- Status From - Select from pick-list.
- Status To - Select from pick-list.
- Alert Hours
- Failure Hours
Example Alert:
Status From - Consignment Arrival from Shipper, Status To - Delivery to Consignee, Alert Hours - 48, Failure Hours - 60
If the elapsed time between From and To is 48-60 hours, an alert is generated. If over 60 hours, it’s considered a failure.
Modify Performance Alerts
To modify a Performance Alert, click the Modify link (in the Action column) on the Manage Performance Alerts screen. Fields will become enabled:

Click the Save link to save any changed data, or click Cancel to discard changes.
Delete Performance Alerts
To delete a Performance Alert, simply click the Delete link on the Manage Performance Alerts screen. A confirmation dialog is displayed, where you may confirm the alert’s deletion, or cancel and return to the previous screen.
END OF DOCUMENT