ameliaCARGO Training Guide
- Nicolas Maillet (Unlicensed)
User Quick Reference List
Outbound Checklist:
Create New Consignment (create AWB)
Payment method - prepaid, collect & cash, account
Shipper and Consignee
Select appropriate charges
Add any additional charges
Enter validation number or BCDL
Save Consignment
Print AWB for shipper to sign, print label for cargo.
Pre-Allocate to Flight (assign cargo to specific flight)
Next available flight
Check thru bases and allocate for next flight (check times)
Manifest Report (summary of outbound cargo)
1 copy to CSAs to enter in amelia (attach to amelia manifest).
1 copy to send to Finance at end of day
Flight Departure
Confirm all consignments have been manifested.
Inbound Checklist:
In-Flight Report (view what cargo is arriving)
Flight Arrival
Receive Consignments (cargo is offloaded and is in our space)
Confirm cargo pieces have actually come off the flight before you receive them.
Consignments for Delivery (as cargo is picked up)
Check if prepaid or collect.
End of Day Reports:
Daily Agents Sales Report
Subject Line: AWBs to follow for ‘base & date’
- Reconcile Payment per normal ‘cash out’ procedures, send ALL outbound AWBs with this report.
Introduction
The ameliaCARGO Airline Cargo Management System has a large number of features including those that large international air carriers would use, but may not be practical for your airline. The features not required at your airline will be made inaccessible, as will sensitive reports.
Key features of ameliaCARGO include:
Automatic waybill generation using predefined Client and Consignee data.
Client-specific cargo rates.
Ability to hide client-specific rates (ie. Contract Rates) from general staff.
Complete workflow tracking from waybill creation, cargo pre-allocation, load list and manifest generation, flight departure and arrival, unloading, interim storage, and delivery.
Exception handling for lost/missing shipments.
Web tracking - based on waybill number.
Client web login for cargo pre-booking.
Warehouse Inventory Control.
Importing and Exporting of cargo.
Security screening and Hold capability.
Management of cargo.
- Weight charges.
Key reasons to use ameliaCARGO:
Data Accuracy
Legibility
Rating
- Reporting
Cargo Basics
For all users, it is important to fully understand the fundamentals of cargo acceptance and air waybill creation. No employee can move forward with this guide, and training, unless the answer to all of the below questions is ‘Yes’.
| Description | Yes | No |
|---|---|---|
| Understands required contact information - names, addresses, telephone #s? | ||
| Understands what dimensional weight is, when to apply it, and how it’s calculated? | ||
| Understands how to calculate floor-bearing weight of a heavy shipment? | ||
| Understands that all shipments must be addressed by the shipper? | ||
| Understands that a proper description of all cargo being shipped is mandatory? | ||
| Understands live animal acceptance rules regarding sizing for kennels, and use of the live animal checklist? | ||
| If necessary due to a system outage, is able to confidently and legibly produce a manual cargo air waybill? | ||
| Understands screening procedures for all cargo before accepting (ACS & DG)? | ||
| Understands payment methods? | ||
| Understands available cargo product types and rating? | ||
| Understands cargo labeling (including the importance of covering up old labels)? | ||
| Understands special handling labels - ie. orientation, perishable? | ||
| Understands the filing system at the base? |
It is expected that every employee that accepts cargo has read your airline’s Cargo Manual. This document is the Standard Operating Procedure for cargo acceptance.
Log into ameliaCARGO
Each Agent must use their own login - sharing of Agent logins is NOT permitted. Any discrepancies are the responsibility of the open/logged-in Agent.
Web Links:
Training - TBA
Live - TBA
Login Screen:

Dashboard Page (shown immediately after login):

Training Guide
Notice the links in the bottom right-hand corner of the Dashboard page. Click the Training Guide link to view a pop-up Training Guide (as shown below). All of the links to the left have an animated demonstration of the associated feature. Take some time to review any items that interest you.


Accepting and Departing
Accepting a Shipment
To enter a shipment into the system, you must first build it by creating a new Consignment. Go to Manage Export Consignments -> Create New Consignment.

Here is the top half of the Create New Consignment screen:

Origin Airport
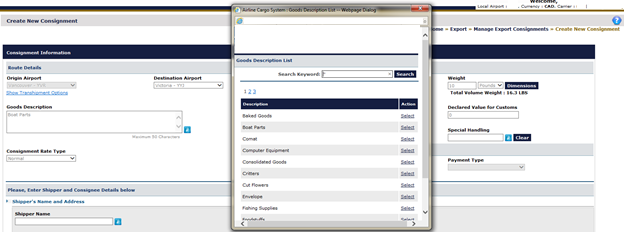
Select item from the list or enter identity of goods tendered, followed by NON-HAZ (see figure)
Destination Airport
Pieces
Weight and Dimensions
Add Dangerous Goods
Enter Declared Value (for Insurance)
Enter Declared Value (for Customs)
Enter Payment Method
If applicable, enter Special Handling
Enter Payment Type
Shipper’s Name, Address, City
Click button next to Shipper Name to see if the shipper is listed. If not, enter the details.
Shipper Account
- Click button next to Shipper Account to see if an account exists for the shipper. If not, just enter Telephone Number.
Export Consignment
If a shipper presents you with a pre-filled air waybill, this is where you begin to transfer that information into the Create New Consignment screen.
Enter the air waybill number:

Click the Create Consignment button to go to the Create New Consignment screen:

Location of Air Waybill Number on Create New Consignment screen:

Here is the bottom half of the Create New Consignment screen.
The Consignee Name and Consignee Account sections require completion in the same manner as the Shipper Name and Shipper Account.

Item 10 above - Special Handling pick-list:

Item 2 above - Goods Description pick-list: (If an item isn’t listed, type it in.)
Item 6 above - Dangerous Goods:

Payment Method - Prepaid or Collect?

Payment Type (Prepaid):

Payment Type (Collect):

Shipper/Consignee Name pick-lists function the same as Shipper/Consignee Account name pick-lists. If an item is NOT listed, enter the required information (Street and Telephone sections are required).

Agent Name and Address - To add a Third Party Handling Company (a Freight Forwarder), click this link:

You will see this:

Click the button next to Agent Name or Agent Account to see a pick-list. If an item is NOT listed, enter the required information (Street and Telephone sections are required).
Save Agent Details - Check this box (the same option exists on the Shipper and Consignee screens) to save a permanent record (for later use) of this Agent.
The next step is to perform a Rates Search:

Tick if you would like to add Additional Charges - Check this box to add ‘Other’ charges (ex: Courier charges, Advance charges, Service charges, etc).
Before proceeding further, click the Remarks link to add notes/comments to list and detail any surcharges you are entering (ex: Delivery Charge $15.00, Advance Fee $5.00).

Once that is complete, click the Continue button.
Other Charges screen:

Select Other Charges, and click the green checkmark to expand this field:
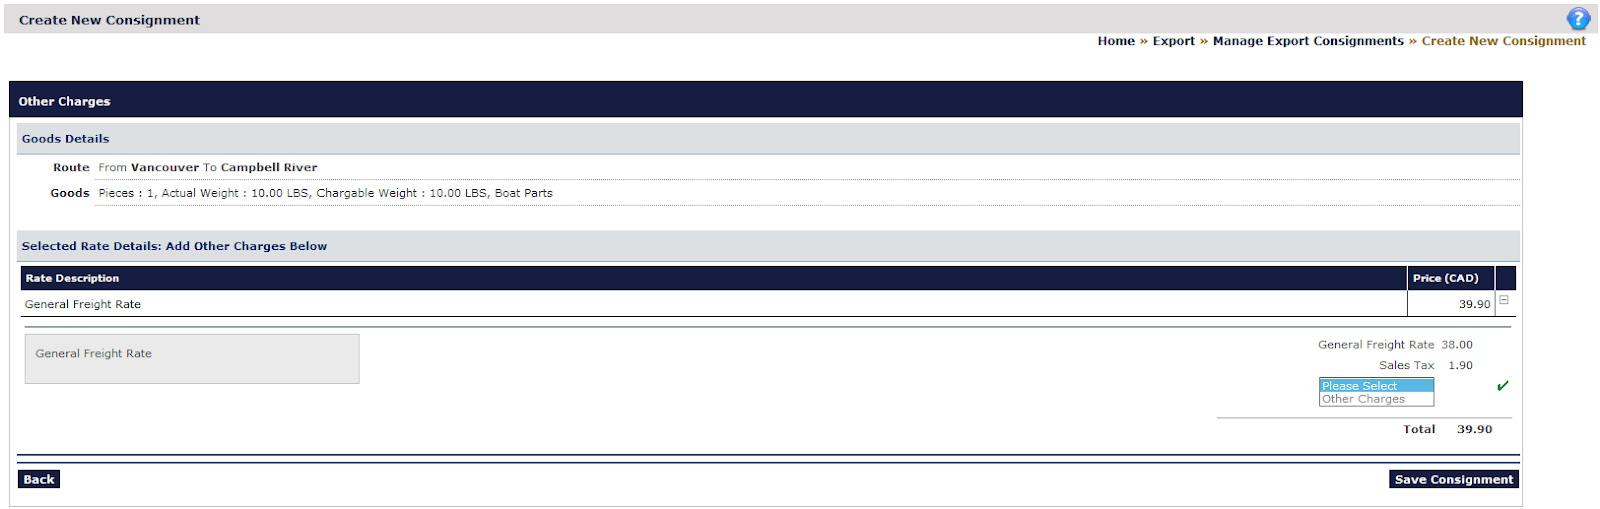
Enter a description and amount for the charge, and click the green checkmark to accept. Repeat this to add as many additional surcharges as necessary. In the example below, a Delivery Charge is being entered.

Once all Other Charges have been entered, click the Save Consignment button.
After the Consignment is saved, you will see a Finish screen, like this:

TIP: If you need to (or forgot to) add Remarks for ‘Other Charges’, make sure to write down or copy (to clipboard) the air waybill number, then access Amend Consignment.
If you’ve forgotten any details, and would like to add them, go to Manage Export Consignments -> Amend Consignment:

This will open the Consignment screen, and allow you to make any required changes.
Once the air waybill details are completed/confirmed, you will see a Finish screen:

From here, you have four (4) options:
Print Air Waybill
Print Label
Create another Consignment
Copy Consignment
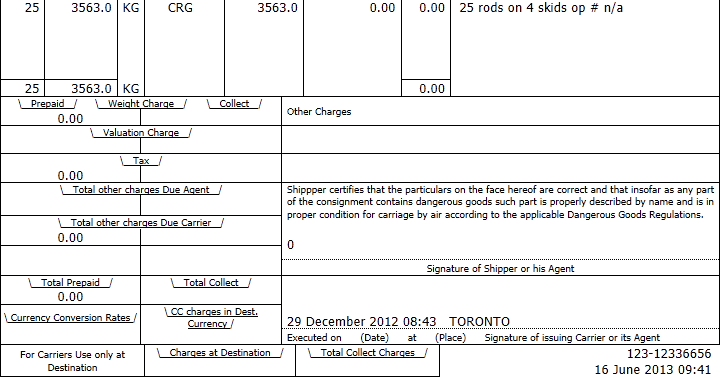
Here is a sample of an ameliaCARGO-generated air waybill:

Pre-Allocate to a Flight
After air waybills have been created/saved (via the Create New Consignment screen), all of them must eventually be allocated to a flight. Be mindful of departure times and ensure you provide adequate notice to the ramp via the Load List.

On the Flight Search, select the Flight Number, Flight Date, and To Airport (destination), and click the Search button.

On the Pre-Allocate to Flight screen (sample shown below), check the items that you want allocated to the flight.


On this screen:
Select the AWBs you wish to allocate to the flight using the checkboxes in the Allocate column.
For Transfer AWBs, select the airport for offload using the listbox in the To Airport column.
AWBs already allocated to the flight are listed at the bottom (in the Consignments on flight (AAA - BBB) section).
Once AWB allocation is complete, click the Allocate button.
Load List
The Load List provides the planned load for a flight. A ramp attendant will confirm the load by checking off items as they are loaded.

Here is a sample of an ameliaCARGO Load List:

Confirm Load
Once the ramp confirms what has been loaded, you can Confirm Allocation.

The Confirm Allocation screen is shown below. If anything was not loaded, or was removed, use the Offload screen to remove it from the flight. If a shipment was split, the ramp must weigh the bumped items and report back. Enter the actual pieces and actual weight loaded.

On this screen:
Confirm pieces and weight matches allocation - select checkboxes to the left.
Once changes are complete, click the Confirm Allocation button to save them.
Manifest Report
Once the allocation is confirmed, run the Manifest Report - this lists the confirmed load on the flight.

Enter the necessary criteria (esp. Flight Number and Flight Date), then click Print Report or Export to Excel. You may also print copies of all manifested waybills using the Print Waybills checkbox.

Here is a sample of a printable Manifest Report:

Depart the Flight
Departing all flights in ameliaCARGO is VERY important! Do this using the Flight Departure menu item.

Enter Flight Number and Flight Date, then click Search.

After the flight is found, enter the Actual Departure Time (this is NOT automatically retrieved from ameliaRES), and click the Depart link.

Arrival Procedure
Overview:
Check In-Flight Report
Flight Arrival
Receive Shipment
Deliver Shipment
- Collect Payment
Check In-Flight Report
Before a flight arrives at your station, an operator should view the In-Flight Report to check what cargo is incoming.

On this screen:
Enter Flight Number (or leave it empty to see all inbound flights). A pick-list is also available.
Select Flight Date.
Select From (originating) Airport.
Click View Report or Print Report.
A sample of the In-Flight Report is shown below. All cargo manifested by the originating station is listed on the report. Incoming cargo is grouped by cargo destined for your station and cargo transiting through your station.

Arriving a Flight
Flights must be ‘arrived’ before incoming cargo can be accepted. To do this, go to Manage Import Flight -> Flight Arrival:

On this screen:
Enter Flight Number (or use the pick-list).
Select Flight Date.
Click the Search button.
Click the Arrive link (for the flight in question).
If successful, a status of ‘Arrived’ replaces the link (in the Action column).
- If you see a message (You cannot arrive this flight since it has cargo and needs to be departed from [AP code].), contact the originating station and get them to ‘depart’ the flight.
Receive Shipment
To receive a shipment, go to Manage Import Flight -> Receive Consignments:

On this screen:
Enter Flight Number (or use the pick-list).
Select Flight Date.
Click the Search button.
In the table of results, select cargo being received using the checkboxes.
Confirm number of pieces, weight, and location (can be typed in or selected from list).
Click the Receive button.
Click OK on the confirmation dialog.
- If successful, a message (X Consignment(s) successfully received.) confirms this.
TRF (Transfer Cargo):
This is cargo making a stop at your base, and that requires a transfer to a connecting flight. Here is the process to follow:
1. Receive everything (including TRF) from the arriving flight:


2. If the Originating Base assigned a Flight Number for the transfer, you must A. Transfer Flight, B. Confirm Allocation, and C. Manifest.
- If no Flight Number was assigned, Pre-Allocate, then Manifest.
A. 

Out-Flight Report (cargo going through your station on the same aircraft):
This shows you through cargo planned on board the aircraft at your station. Through Cargo is NOT visible on your local manifest, but it’s important to be aware of what remains on board before adding cargo to a flight.
Go to Manage Export Flight -> Out-Flight Report:


NOTE that a remark is inserted stating the cargo in question is staying on the flight.
Delivering Consignment
To deliver a Consignment, go to Manage Delivery -> Consignments for Delivery:

On this screen:
Enter search criteria (one of Consignment (AWB) Number, Consignee Name, From Date, To Date).
- In the shipment list (search results), click the AWB link (Consignment #) to go to the Deliver Consignment screen.

On the Deliver Consignment screen (shown below):
Add notification info - use the listbox, and confirm with the green checkmark.
Add relevant remarks (in the Remarks section).
Confirm Pieces and Weight. If NOT delivering the entire shipment, change Pieces/Weight as required.
Confirm Delivery Date/Time.
Enter Collector Name, Delivery Reference No. and Vehicle Registration No.
Collector Name - full name of Collector.
Delivery Reference No. - enter if applicable (ex: Novex 3111111); or enter N/A.
Vehicle Registration No. - enter Collector’s ID # (company/driver # is acceptable).
Click the Deliver button to confirm/complete delivery.

Collect Payment
To collect payment:
- Choose Payment Type from the listbox. (Use Non-Account for cash/credit card/debit card/cheque transactions.)

Choose Payment Method from the listbox:
Description - Visa, MasterCard, Amex, etc.
Amount - collected amount
- Click the green checkmark to confirm/complete.

Click the Deliver button to confirm.
- If successful, a confirmation message (Consignment Delivered Successfully!) is displayed, and the Invoice and Delivery Receipt are printed.
Non-Account Shipments
The Non-Account feature is used when Cargo Credit is not available for the Shipper or Consignee. It also applies (for cross-reference purposes) if the shipment is being charged to a Quick Pass Account for Cargo Seats only.
The payment screen is the same for Prepaid and Collect payments.

Method = Prepaid, Type = Non-Account OR Method = Collect, Type = Non-Account
This Payment screen is displayed for ALL Non-Account payments.
Cash Example:

Enter the FULL amount paid in Cash, and click the green checkmark to confirm. Click the Save Consignment button to continue.
Other Payment Options:

Other payment options include:
Credit Card
Debit Card
Cheque
Res Number (for QP deductions)
Credit Card:

Debit Card:

Paid by Cheque:

Res Number (Use for cross-reference when Quick Passes are to be deducted.):

It’s critical to insert the Reservation Number here when Quick Passes are used to pay for cargo seats.
Discrepancies
Types of Discrepancies
A. Shipments are not visible to permit Pre-Allocation:
Three (3) conditions/scenarios can cause shipments to not display on the pre-allocation list - a. Cash pre-payments not entered properly or b. payment not made in full, c. or the Security Check has NOT been completed.
B. Shipments are missed or have a Discrepancy:
- MISSED: Shipments may have been manifested, BUT for any number of reasons NOT physically loaded onto a flight. LEAVE THIS SHIPMENT ON YOUR IN-FIGHT REPORT! The originating base must be notified - their follow-up is to trace the shipment’s location. IF it’s found to still be at the origin/base, they must perform a Short Ship transaction - this will remove the shipment from the destination airport’s In-Flight Report.
- DISCREPANCY: A shipment has arrived without being manifested (for any number of reasons). Use the Found Transaction button at the bottom-left of the Receive Consignment screen OR go to Discrepancy Details -> Found Cargo.
Cash Pre-Payments
Two (2) possible discrepancies can occur with Shippers pre-paying without accounts.
| Payment Method | Payment Type |
|---|---|
| Payment Prepaid | Non-Account |
| Payment Prepaid | Unknown |
A. Payment Type = Unknown
Correct combination:

Incorrect combination:

NOTE: When Payment Type is Unknown, the Cash Payment screen will not be displayed.
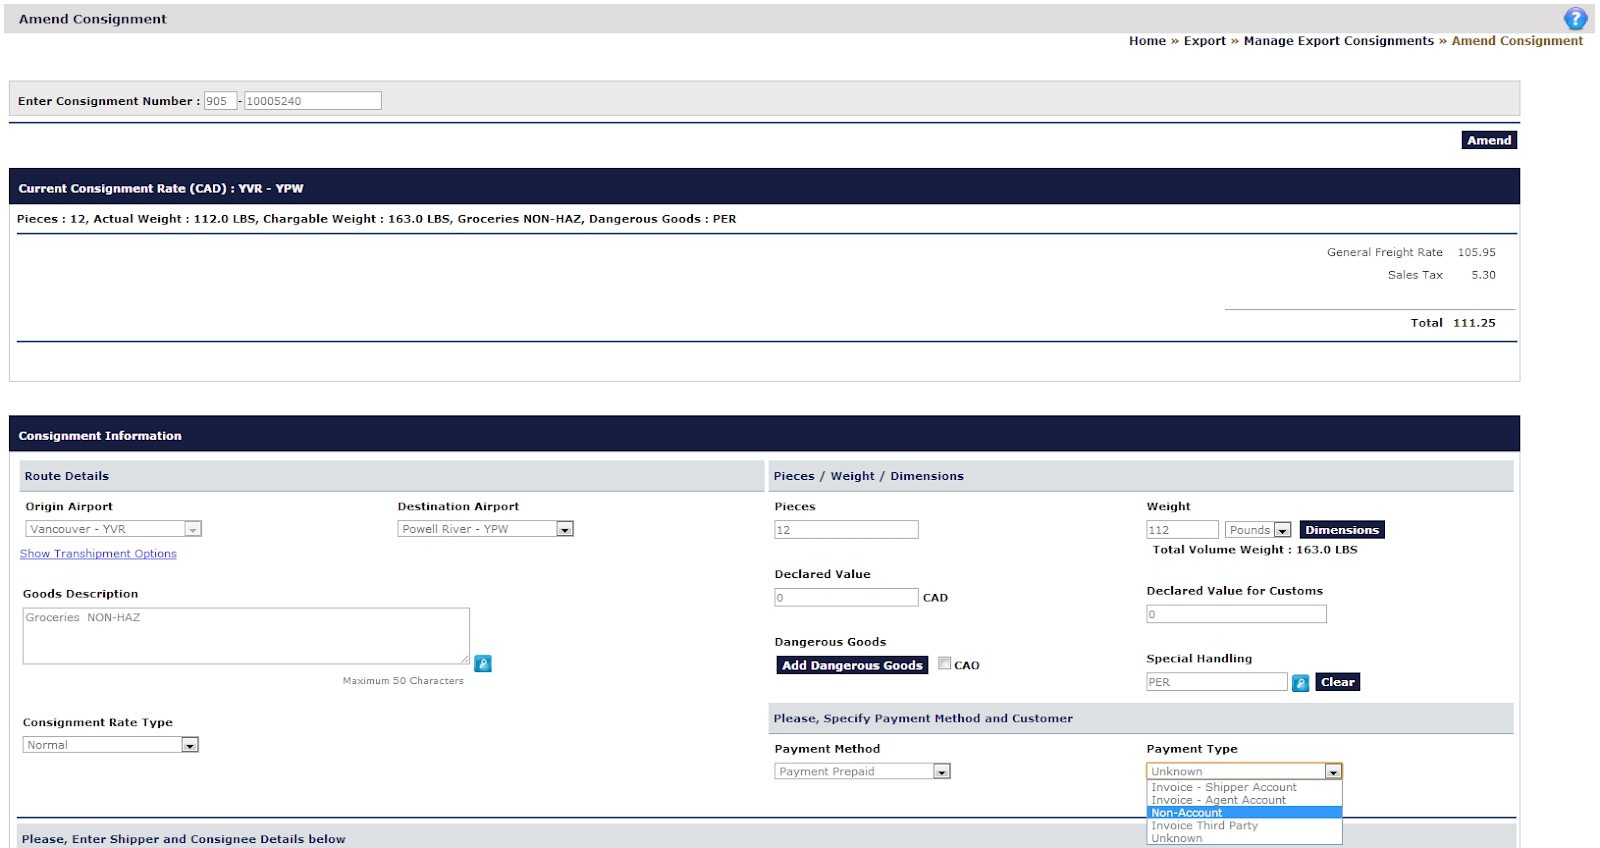
As a result of this, the shipment will not appear for pre-allocation. There is no guarantee against human error while physically loading the shipment! If you believe the Payment Type was set to Unknown, go to Amend Consignment to change it to Non-Account.

On the Amend Consignment screen, enter the AWB # and click Amend.

Consignment screen (with shipment needing correction displayed):
On this screen:
Enter amount paid.
Click green checkmark to confirm.
Click the Save Consignment button. (Do NOT click the Amend button!)
The output will look like this:

B. Payment incorrect or not confirmed:
To correct/confirm Non-Account payments, go to Accounting -> Consignment Payments.

On the Consignment Payments screen, enter the AWB # and click Search.

Then, click the Receive Payment link:

Verify the Payment Method, enter any necessary Remarks (ex: Paid by Cash), and click the Save button.

Then, click Print Receipt (to print a copy of the receipt) and Done (to complete the process).

Either of these methods (A or B above) will ensure the Prepaid Cash shipment is visible on the Pre-Allocation List.
Security Check Missed
If the Security Check was missed, go to Manage Export Consignments -> Security Check.

On the Security Check screen, enter the AWB #, leave Destination set to Any (Origin should populate), and click Search.
(If you can’t remember the AWB #, leave Consignment Number empty.)


Found Cargo
There are two (2) ways to FIND non-manifested cargo at your base:
1. Click Found Cargo on the Receive Consignments screen (with the flight on which cargo was confirmed selected):

Flight Number, Date, Origin / Destination (your station) should be populated. Enter the AWB #, pieces and weight.

NOTE: This transaction is required for any non-manifested cargo arriving at your station.
2. Go to Discrepancy Details -> Found Cargo:

This displays the same Found Cargo screen as shown above, BUT you MUST enter AWB #, Found Pieces, Found Weight, Flight, Date, Origin, and Destination.
Lost Cargo
The Lost Cargo transaction must ONLY be used when absolutely necessary, ie. when you have actually lost a shipment at your base.

Enter the AWB #, Lost Pieces, Lost Weight, Flight Number, and Date, then click Find:

Click the Confirm Lost Cargo button to confirm, and complete this process.
Transshipments
Definition and Responsibilities
A. Definition of Interline Transfer of Cargo:
This is when a shipment is brought by one airline to another. The air waybill provided by the transferring airline is the document used to facilitate continued movement of the shipment. Interline transfers of cargo will only take place if:
Both airlines are IATA (International Air Transport Association) members. OR
The airlines (yours and another) have a Cargo Interline Agreement between them.
At the place of transfer, a Transfer Manifest is provided by the transferring airline to the receiving airline.
B. Responsibility of the Transferring Airline:
Complete a transfer manifest.
Ensure the AWB Number, pieces, and labeled destination match.
It’s mandatory to indicate for shipments from non-secure bases that the “Shipment has been searched.”
It’s essential that the Transfer Manifest is signed by a representative of the receiving airline.
One (1) copy of the Transfer Manifest is sent to Finance. Another copy is kept in the Base Interline transfer file. The receiving carrier is given one (1) copy of the transfer manifest.
C. Responsibility of the Receiving Airline:
Note any damages or shortages on the Transfer Manifest - If this is not done, 100% liability goes to the receiving airline should any claims need to be paid out.
- Send one (1) copy of the Transfer Manifest to Finance - Attach a copy of the original air waybill and a copy of the ameliaCARGO air waybill. Retain another copy in the Base Interline transfer file, with a copy of the original AWB attached. Attach another copy of the original AWB to the Base copy created in ameliaCARGO.
Creation of a Transshipment TO an Interline Partner
Here is an example of a transshipment from your airline to another.
Step 1 - Click on Show Transhipment Options.

Step 2 - Enter required data.

On the left (Tranship From & Carrier), use the second pick-list to select your airline’s Carrier Code. Then use the first pick-list to populate the originating station (it should get automatically populated).
- On the right (Tranship To & Carrier), use the second pick-list to select the interline airline’s Carrier Code. Select Destination Airport, then use the first pick-list to populate the destination airport/station’s code.
Step 3 - Process shipment as Prepaid.

Process the shipment as PREPAID to the destination airport. Complete payment as you would any prepaid shipment. All charges MUST be displayed in full; otherwise, the shipment may be refused by the Interline Airline.
Creation of a Transshipment FROM an Interline Partner
Here is an example of a transshipment to your airline (from an interline partner).
Step 1 - Click on Show Transhipment Options.
Step 2 - Enter required data.

Select appropriate Origin Airport (ex: Whitehorse).
Use the pick-list to select appropriate interline carrier (ex: 4N).
Use the pick-list to populate airport code (Tranship From).
Use the pick-list to select Destination Airport.
Use the pick-list to select your airline’s carrier code (in Tranship To section).
Use the pick-list to populate airport code (Tranship To).
Step 3 - Payment
For this type of shipment, payment should always be prepaid to Third Party (Interline Carrier’s account):

Step 4 - Complete the Create New Consignment process.
Complete the consignment as you would any other. Do NOT shortcut entering data from the Interline AWB - Let the system generate the proper rate. Don’t be concerned with rates shown in the Interline AWB. Exception: If a delivery request is indicated, enter the appropriate amount in the Other Charges section.
Once the consignment is saved, you will see something like this. Charges in the top and bottom areas should match to the penny.

Click the Save Consignment button. You will see the Finish screen.
Transfer of a Transshipment to an Interline Partner
Here is an example of a transshipment to an interline cargo partner.
Step 1 - Arrive the flight. If everything is confirmed to be on-hand, receive ALL items.

Step 2 - Go to Manage Delivery -> Transhipment Transfer.

Step 3 - Enter the AWB # ONLY, and click Search.

Step 4 - In the search results, click the Consignment # (link).

Step 5 - Select the Delivery Date, and enter:
Time
Collector Name (Name of signing agent at receiving airline)
Delivery Reference No. (Use the Carrier Code.)
- Vehicle Registration No. (Optional, you may enter ‘x’.)

Then, click the Transfer button.
Step 6 - (optional) Attach the Transhipment Transfer Receipt to the base copy of the Interline Transfer Manifest. (Not required when Interline Transfer Manifests are used.)

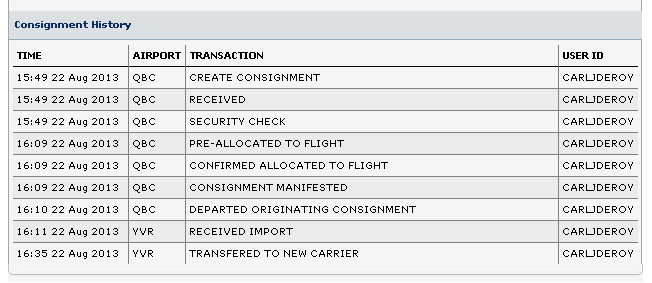
Once the transfer is complete, the Shipment History will look like this:
END OF DOCUMENT