2 - Reservations
- Nicolas Maillet (Unlicensed)
- Nigel Martin
- Binh Nguyen
Passenger Reservation Screen
The Passenger Reservation screen is displayed when you open a reservation for viewing or editing. The main area of the Passenger Reservation screen is divided into 3 separate regions: the Passengers Information region, the Segments Information region, and the Contact Information region.

Figure 1: Passenger Reservation screen
Table 5: Passenger Reservation Screen Descriptions
| Control | Description |
|---|---|
| Change Pax | When the Passengers area is selected, use this button to open the Passenger List screen, where you can add, remove, change, and split passengers on this reservation. |
| Change Seg | When the Segments area is selected, use this button to open the Reservation Segments screen, where you can add, edit, or cancel segments on this reservation. |
| Change Contact | When the Contact Information area is selected, use this button to open the Contact Information screen, where you can edit the reservation’s main contact info. The Contact Information area is also used to store the reservation's notes. Therefore, you may use Change Contact function to add or edit notes. Note: for GDS bookings, the SSR information received from the originating GDS is saved in the Notes section of the Contact Information region |
| Payment | Use to open the Payment screen, where you can process payments (available payment methods based on system configuration). |
| Itinerary | Use to open the Itinerary screen, where you can view, print, or email the Itinerary for this reservation. |
| (CTRL+SHIFT) Email Itinerary | Use to email the Itinerary for this reservation to the primary contact. |
| Charges | Use to open the Reservation Charges screen, where you can view and edit charges, or refund payments made on the reservation. |
| Ticket # | Use to assign or change the ticket number associated with the selected passenger segment. Note: This feature is not used for airlines using ameliaRES Ticketing V2. |
| Cancel Res | Use to cancel all segments for all passengers on the reservation. This button is only enabled when no reservation payments have been made, or when all payments have been fully refunded. |
| Hold/Release | Use to put the reservation On Hold, or to release the Hold. This button is only enabled when no reservation payments have been made, or when all payments have been fully refunded. |
| Edit Route | Use to modify the reservation’s routing (with the proper Permissions) without applying cancellation/modification fees. |
| View History | Use to see a high-level history of the reservation. |
| Agency | Use to change the agency assigned to the reservation. |
| GDS Loc | Use to edit the GDS Locator information for this reservation. |
| GDS Msg | Use to view the originating GDS message (when GDS module is enabled, and reservation originated from GDS). |
| Res Audit | Use to view a detailed modification history (audit trail) for this reservation. |
| Alt Loyalty Id | Use to edit the Loyalty ID associated with the reservation (when Loyalty module is enabled). |
| Select Seat | Use to open the Seat Selection Tool screen, where you can assign passengers to specific seats (when Seat Selection module is enabled). |
| Ancillary Items | Use to add or edit ancillary items on the reservation (when Ancillary Items module is enabled). Note: This button may show "Shop Items" for your airline |
| Res Search | Use to return to the Reservation Selector screen (keeps the current reservation open). |
| Tickets | Use to open the Reservation Tickets screen, where you can view E-Tickets and EMDs associated with the reservation. |
| Currency Converter | Use to open a currency conversion tool allowing you to input a value in the default currency and view it converted in other available currencies. |
TIPs: Double-click on some specific fields will open up the Edit window pertaining to these fields.
For example, double-click on a passenger name will show the Passenger List screen from where you can edit the passenger details for that passenger; Double-click on the "Seat #" field for a segment will show the Seat Map for that flight segment from where you can select or change the seat number.
Passenger List Screen
The Passenger List screen is displayed at the end of the booking process to allow quick entry of passenger information for the reservation. This screen can also be opened from the Passenger Reservation screen, after selecting the Passenger Information area, by clicking the 2 - Change Pax button.
The Passenger List will initially contain T.B.A., Adult and/or T.B.A., Child entries when finalizing the reservation, and when adding passengers. These should be changed immediately as several operations are not available on T.B.A. passengers.
NOTE: If the passenger name is not advised for a T.B.A. passenger, ameliaRES ticket is not generated even if payment is already made
TIP: Hold down the CTRL to select multiple passengers at once.

Figure 2: Passenger List screen
Table 6: Passenger Reservation Screen Descriptions
| Control | Description |
|---|---|
| Change | Use to change the selected passenger. You may select an existing profile or create a new passenger profile. |
| Add Pax | Use to add a passenger (adult or child) to the reservation. |
| Cnx Pax | Use to cancel or remove the selected passenger(s). |
| New Res | Use to split the selected passenger(s) to a new reservation. |
| Infants | Use to open the Infants screen, where you can manage infants for this reservation. |
| Select | When searching existing passengers, use the Select button to assign the selected profile to the selected passenger. |
| New | Use to create a new (blank) passenger, i.e. to replace a T.B.A. passenger with a passenger name |
| Edit | Use to edit the selected passenger. |
| Save | Use to save changes to the selected passenger. |
| Charge Company | Use to automatically charge the associated company’s account for the reservation and any subsequent modifications. This checkbox is only enabled when the reservation is linked to a company account. |
Changing a Passenger
To change a passenger, select the passenger in the Passengers area of the Passenger List screen and click 2 - Change. Enter the name (in LastName, FirstName format) in the Passenger Search textbox. Click the 3 - Search button to initiate the search, choose a name, and click the 3 - Select button. If there are multiple matches, select a profile from the search results and click the 3 - Select button again. Details of the selected result are applied to the selected passenger.
Alternatively, you may provide a new name and new details for the selected passenger, by clicking the 4 - New button.
Editing a Passenger
To edit a passenger’s information, select the passenger in the Passengers area of the Passenger List screen and click 5 - Edit. Once you’ve edited the passenger, click the S - Save button.
NOTE: When changing or editing the name for a passenger for whom an ameliaRES ticket has been generated, the ticket details is unchanged. The old name's ticket needs to be either refunded or exchanged to the new name's ticket as per the airline's policy.
In order to exchange the old passenger name's ticket to the new passenger name, the fare charge for the passenger must be Edited and Saved in the Reservation Charges screen. For refund, refer to the Refunding Payment section.
New Passenger
To create a new passenger record, select the passenger in the Passengers area of the Passenger List screen and click 4 - New. Enter the information for the new passenger in the right half of the Passenger List screen - fields with bolded labels require a value. Click the S - Save button to save the new passenger.
Adding Passengers
To add passengers to a reservation, simply click the A - Add Pax button on the Passenger List screen. This will open the Fare Class Selection screen, where you can select the number of adults/children to add and assign fares to the new passenger(s).
Cancelling Passengers
To remove a passenger from the reservation, select the passenger in the Passengers area of the Passenger List screen and click R - Cnx Pax. You will be asked to confirm - Select Yes to cancel the passenger and any associated segments and charges. The cancelled passenger will display in red and with a strikethrough.
NOTE: The R - Cnx Pax button is only enabled when no payments have been made for the selected passenger, or if they have been refunded.
Splitting Passengers
To split one or more passengers from the reservation (onto a new reservation), select the passenger(s) in the Passenger area of the Passenger List screen and click N - New Res. You will be asked to confirm - Select Yes to create a new reservation and move the selected passenger(s) to it.
NOTE: The record locators of the original booking and the new booking can be found in the Res Audit information of split PNRs
Infants
To display infant details or to add an infant to a reservation, select the passenger with whom the infant is associated then open the Infants screen using the Infants button on the Passenger List screen. From the Infants screen, you can add, edit, or remove infants associated with passengers on this reservation.
NOTE: The I - Infants button is only enabled when a passenger has been properly named - infants cannot be associated to T.B.A. passengers.

Figure 3: Infants screen
Adding Infants
Click the A - Add button on the Infants screen and enter the infant details. Click the S - Save button to complete the operation.

Figure 4: Infant Details screen
Editing Infant Information
To edit an infant’s information, select the infant on the Infants screen and click the E - Edit button. Enter the new details and click the S - Save button.
IMPORTANT NOTE: when it is required to correct the name of an infant whose ameliaRES ticket has been issued, it is strongly recommended that the infant's ticket is refunded before editing the infant's name. Failing to do so will cause problems to the infant ticket.
Deleting an Infant
To delete an infant from the reservation, simply select it on the Infants screen and click the D - Delete button. You will be asked to confirm - Select Yes to remove the infant.
Reservation Segments Screen
The Reservation Segments screen allows you to add, edit, or remove segments on the current reservation. To open it, select the Segment Information area of the Passenger Reservation screen and click the 2 - Change Seg button.

Figure 5: Reservation Segments screen
Adding a Segment (Confirmed)
To add a Confirmed segment, click the 2 - Add button on the Reservation Segments screen. The rest of the process is identical to creating a By Schedule booking.
Adding a Segment (Standby)
To add a Standby segment, click the B - Standby button on the Reservation Segments screen. The rest of the process is identical to creating a Standby booking.
Editing a Segment
To edit a segment, select the segment on the Reservation Segments screen and click the 3 - Edit button. Enter the new parameters and click 0 - By Schedule (to create a confirmed segment) or B - Standby (to create a standby segment).

Figure 6: Reservation Segments screen - Edit mode
Modification charge may incur for editing segment. When it prompts for applying the modification charge, select 3 - Yes to apply the charge or select 4 - No to override the charge, i.e. not to apply it. You may also use the 2 - Remove button to remove one or all of the modification charge items before selecting 3 - Yes or 4 - No .

NOTE: Only the users with the appropriate permission can override or remove modification/cancellation charge.
Cancelling a Segment
To cancel a segment, select the segment on the Reservation Segments screen and click the 4 - Cancel Seg button. You will be asked to specify the cancellation charge - Select Continue to complete the operation.
Similarly to Editing a Segment, cancelling a segment may incur cancellation charge.
Contact Information Screen
The Contact Information screen allows you to change the reservation’s primary contact info. Open it by selecting the Contact Information area of the Passenger Reservation screen and clicking the 2 - Change Contact button. Enter the new details and click the S - Save button.

Figure 7: Contact Information screen
Some permissions (View, Append, Modify) have been added around the Reservation Notes. Depending on these Permissions, Groups/Users may be allowed to view Notes (no changes), append Notes (add, but not edit existing Notes), or modify Notes (add, and edit/remove existing Notes).
Payment Screen
The Payment screen allows you to process reservation payments (available payment methods are based on system configuration). Click the 3 - Payment button on the Passenger Reservation screen to open it. The payment Amount will default to the Balance Due on the reservation, but this amount can be changed if necessary (such as if the customer wishes to make a partial payment).
NOTE: Some payment methods may require a receipt number, depending on system configuration.

Figure 8: Payment screen
IMPORTANT NOTE: If your airline uses ameliaRES Ticket, never use the Payment screen with a negative payment amount. Doing so will lead to incorrect ticket/EMD utilization.
Cash Payments
Cash-type payment methods (Cash, Debit, Cheque, etc) are the simplest to complete: Select the appropriate payment type from the Method dropdown, adjust the amount if needed, and click the S - Save button.
Credit Card Payments
Credit Card-type payment methods are usually the most requested. Select the appropriate payment type from the Method dropdown, adjust the amount if needed, and click the A - Authorize button - This will display the Credit Card Payment screen.

Figure 9: Credit Card Payment screen
On the Credit Card Payment screen, enter the card/cardholder details, and click A - Authorization. If the transaction is successful, an Authorization Number is displayed. If not, an error message (the reason for the failure) is displayed instead.
On Account Payments
On Account payment is available if the person or organization paying for the reservation has an account with your airline. To make an On Account payment, select the appropriate payment type from the Method dropdown, adjust the amount if needed, select the Payer (the account from which funds will be debited) from the Payer Name dropdown, and click the S - Save button.
If an error occurs while processing the payment, an error message will notify you of this. If the payment is successful, the Payment screen will close.
Voucher Payments
Vouchers can be used to pay some or all of a passenger’s reservation charges. Depending on the type of voucher, the total charges may or may not be processed. To make a Voucher payment, select the appropriate payment type from the Method dropdown, adjust the amount if needed, select the Payer (the passenger who has been assigned the Voucher from which funds will be debited) from the Payer Name dropdown, and click the S - Save button.

Figure 10: Voucher Redemption screen
On the Voucher Redemption screen, enter the voucher’s Serial Number and click Search. The voucher details are populated when the search is successful. Enter the PIN and Password, and click Redeem to complete the payment.
Partial Payments
By default, the payment amount is the balance due amount. Sometimes the passenger may wish to make a partial payment, for example to make deposit for a group booking. Users with the permission can make partial payment by adjusting the payment amount in the 2 Amount box of the Payment screen.
If your airline use ameliaRES Ticketing, and if the partial payment amount is not sufficient to issue a ticket, the partial payment amount is recorded in an EMD with the reason for issuance sub-code (RFISC) of 997 (deposits/down payments) as shown in the below example of a Reservation Tickets screen.
The partial payment amount is used to cover the fares and charges in the booking when the remainder balance due is paid for. At that time, the deposit/down payment EMD is exchanged to the newly issued ticket(s) or EMD(s).

Itinerary Screen
The Itinerary screen allows you to view, print or email a reservation’s itinerary. Click the 4 - Itinerary button on the Passenger Reservation screen to open it. It is possible to have itineraries in several languages, depending on system configuration.

Figure 11: Itinerary screen
Table 7: Itinerary Screen Descriptions
| Control | Description |
|---|---|
| Detail | Use to select a detailed itinerary. The detail levels are compared in Table 8 (Itinerary Detail Levels Comparison) below. |
| Summary | Use to select a summary itinerary. The detail levels are compared in Table 8 (Itinerary Detail Levels Comparison) below. |
| No Figures | Use to select a no-figures itinerary. The detail levels are compared in Table 8 (Itinerary Detail Levels Comparison) below. |
| Screen | Use to output the itinerary to the ameliaRES report viewer. You may then view it on screen, save it as HTML, or send it via e-mail. |
| Printer | Use to send the itinerary to your system-configured printer. |
Table 8: Itinerary Detail Levels Comparison
| Information | Detail | Summary | No Figures |
|---|---|---|---|
| Primary Passenger Details | X | X | X |
| Reservation Notes | X | X | X |
| Summary of Charges | X | X | - |
| Secondary Passengers List | X | X | X |
| Infants List | X | X | X |
| Itinerary Details | X | X | X |
| Count of Passengers Grid | X | X | X |
| Detailed Charges Grid | X | - | - |
| Payment Information | X | - | - |
| Agency Information | X | X | X |
Email Itinerary
To email a reservation’s itinerary to the primary contact (e-mail address must have been provided in the reservation contact info), use the CTRL+SHIFT keyboard shortcut and click the 4 - Email Itin button.
Reservation Charges
The Reservation Charges screen allows you to view, add, edit, or cancel charges on a reservation. You can also refund payments from this screen. To access the Reservation Charges screen, click the 5 - Charges button on the Passenger Reservation screen.

Figure 12: Reservation Charges screen
Table 9: Reservation Charges Screen Descriptions
| Control | Description |
|---|---|
| Add | Use to open the Add Reservation Charge screen, where you can add charges. |
| Edit | Use to open the Edit Reservation Charges screen, where you can edit a charge. |
| Add Payment | Use to open the Payment screen, where you can make a payment. |
| Refund Payment | Use to open the Payment screen in Refund mode. |
| Print Payments | Use to send a list of payments to the printer. |
| Edit Payer | Use to open the Payment screen in Edit mode, where you can edit the Payer. |
| Edit PO | Use to open the Payment screen in Edit mode, where you can edit the PO Number. |
| Transfer Credit | Use to transfer outstanding credits to another reservation. |
| Create Voucher | Use to transfer outstanding credits to a Voucher (for future use). |
| Show Charges History | When Unchecked, only the current charges are displayed. Check this box to show all current and historical charges |
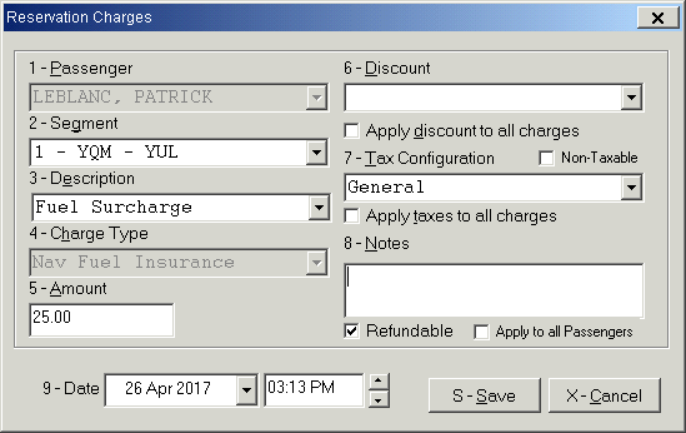
Adding Charges
To add a charge, click 2 - Add on the Reservation Charges screen. This will open the Add Reservation Charges screen, where you can enter the particulars of the new charge. Click the S - Save button to complete the operation.

Figure 13: Add Reservation Charges screen
Editing Charges
To edit a charge, select it and click 3 - Edit on the Reservation Charges screen. This will open the Edit Reservation Charges screen, where you can change the charge details. Click the S - Save button to complete the operation.
Note: When editing an existing reservation charge, the “Apply to all Passengers” checkbox only affects passenger charges that match the charge being modified (same surcharge/charge type, description, and total amount).
Figure 14: Edit Reservation Charges screen
IMPORTANT NOTE: If your airline use ameliaRES Ticket, when the Edit Reservation Charges screen is Saved, the system automatically exchanges the ticket or EMD associated to the charge item being edited, even if you Save the Edit Reservation Charges screen without making any change.
Editing Fare Charges
To edit a fare charge on a reservation, select it and click 3 - Edit on the Reservation Charges screen. This will open the Edit Reservation Fares screen, where you can change the fare details (such as applicable discounts and taxes). Click the S - Save button to complete the operation.

Figure 15: Edit Reservation Fares screen
IMPORTANT NOTE: If your airline use ameliaRES Ticket, when the Edit Reservation Charges screen is Saved, the system automatically exchanges the ticket associated to the fare charge item being edited, even if you Save the Edit Reservation Charges screen without making any change.
Refunding Payments
To refund a payment, select it and click 7 - Refund on the Reservation Charges screen.

This will open the Payment screen in Refund mode, where you can select all the passengers or only the the applicable passenger(s) (to refund their associated charges) and/or adjust the refund amount (for a partial refund).
Click the S - Save button to complete the operation.

Figure 16: Payment screen - Refund mode
IMPORTANT NOTE: If your airline uses ameliaRES Ticket, it is strongly recommended that you follow the above steps to refund a payment.
Never use the 3 - Payment button in the main Passenger Reservations screen nor use the 6- Add Payment button in the Reservation Charges screen to refund a ticket or EMD. Doing so will lead to incorrect ticket/EMD utilization and incorrect financial reports.
Transferring Credits
To open the Transfer Credit screen, click the T - Transfer Credit button on the Reservation Charges screen. Find and select an existing reservation, and specify the amount of credit to transfer. Click the S - Save button to complete the operation.

Figure 17: Transfer Credit screen
Cancel / Activate Reservation
To cancel a reservation, click the 7 - Cancel Res button on the Passenger Reservation screen.
NOTE: The 7 - Cancel Res button is only enabled when no payments have been made, or when all payments have been fully refunded.
To reactivate a reservation (after it’s been cancelled), click the 7 - Activate Res button.
NOTE: Segments are NOT re-added when a reservation is re-activated. New segments need to be created.
Hold / Release Hold
To place a reservation On Hold, click the H - Hold button on the Passenger Reservation screen. Specify the Hold Until date and time, and click H - Hold. The Hold Until date is displayed in red at the bottom of the Passenger Reservation screen.
NOTE: The H - Hold button is only enabled when no payments have been made.
WARNING: Once the Hold Until date passes, the reservation is automatically cancelled.
To release the Hold on a reservation, click the R - Release button on the Passenger Reservation screen.
Edit Route
The Edit Route function allows you to change the flight and date details for a segment. Select a segment in the Segment Information section on the Passenger Reservation screen, and click the E - Edit Route button. You will be asked to specify the new departure date and/or flight for the selected segment.
NOTE: The Edit Route process does NOT trigger any modification fees.
Reservation History
The Reservation History screen displays a high-level history of the reservation - the date/time, user, and reason for the change are included. To access this information, click the 8 - View History button on the Passenger Reservation screen.

Figure 18: Reservation History screen
Change Agency
To change the Agency assigned to a reservation, click the A - Agency button on the Passenger Reservation screen, and select the new Agency.
WARNING: Any commissions accrued by the original Agency are transferred to the selected Agency.
Reservation Audit
The Reservation Audit screen displays a detailed history of changes to the reservation. To view it, simply click the Res Audit button on the Passenger Reservation screen.
NOTE: The Date and Time shown in Reservation Audit depend on the User Preferences.
Tickets and EMDs
Issuing Amelia Tickets and EMDs
For airlines using ameliaRES Ticketing, after creating a reservation in the ameliaRes application, you will be able to create the amelia Tickets and EMDs by making payments on that reservation's charges.
When a passenger's balance is paid in full, the system automatically issues an Amelia Ticket for each passenger, as well as for any infant. The ameliaRES Tickets can be assigned to any passenger types so long as it can have a charge on the reservation.
EMDs are created based on the charge types paid for. In the example below, each passenger has been assigned a Rebooking Fee EMD for having paid off their balance, including their rebooking fee, in full.
EMDs may be issued for multiple purposes such as extra charges for chargeable ancillary services, cancellation or modification fees, handling fees etc. Each charge type for which EMD issuance is desired needs to be configured in the system to link with a RFISC (Reason For Issuance Sub-Code).
Display Reservation Tickets and EMDs
For airlines using ameliaRES Ticketing and/or GDS E-Ticket, E-Tickets and EMDs associated to the passenger(s) in the PNR can be accessed via the Passenger Reservation screen. Simply click the T - Tickets button in the main Passenger Reservations screen to show the Reservation Tickets screen.

Figure: Reservation Tickets
Tickets and EMDs Details
You may display the details (a.k.a. image) for a ticket and EMD in the Reservation Tickets grid by selecting the ticket and/or EMD then click the Display button. The ticket/EMD details is displayed with the information derived from the E-ticketing database (ETDB).

Figure: Ticket Details
Voiding Amelia Tickets and EMDs
Void function is not currently supported.
Refund ameliaRes Tickets and EMDs
The Refund Payment transaction in the Reservation Charges screen results in refunding of ameliaRes tickets and/or EMDs in the reservation.
In general, if the ticket value is fully refunded without covering any other charges then the ticket coupon status is changed to "Refunded". For example, the passenger's ticket value is $100 and you refund $100 for that passenger, without applying any refund or cancellation penalty, the status of the ticket coupon(s) is "Refunded".
If the payment for a ticket is refunded and there is at least a charge incurs, the ticket value is used to cover the charges pertaining to refunding the payment. For example before refunding the payment you have cancelled the segment(s) and the cancellation penalty of $10 has applied, the ticket value of $100 is used to cover cancellation penalty. In such a case, the ticket is automatically exchanged to an EMD, value of $10, for the penalty charge. The remaining amount $90 of the ticket value, after deducting the penalty, is exchanged to a residual EMD with the default RFISC of 99I (Residual value). The residual EMD of $90 is then changed to the "Refunded" status when the amount of $90 is refunded.
Cancellation of flight segments can be done before or after the refund transaction. The tickets and EMDs are processed as outlined below:
Refund after cancelling the segment(s):
- When you cancel a segment, if the Cancellation or No-Show charge is automatically applied, the ticket is automatically exchanged to an EMD to cover that charge and another EMD for the residual amount. When you refund the payment, the residual EMD is moved the the "Refunded" status.
- When you cancel a segment, if the Cancellation or No-Show charge is not automatically applied, the ticket remains unchanged. You may manually add a charge (such as Cancellation or No-Show or Refund penalty) to the reservation before refunding.
- If no penalty charge is added, when you refund the payment, the ticket coupon is moved to the "Refunded" status.
- If you add a penalty charge, the ticket is exchanged to an EMD to cover the charge and to another EMD for the residual amount (which will then be moved to the "Refunded" status when you refund the payment).
WARNING: The below 2 conditions must be met so that the EMD corresponding to a penalty charge will not be refunded when you refund the payment:
(1) The penalty charge is configured as "Consumed at Issuance" (by your control users in the Utilities>Charge Types and/or the Utilities>Charges screens ), and
(2) The penalty charge is set as "Non-Refundable" (meaning the Refundable box for that charge item is unchecked in the Reservation Charges screen).
- In case of a multiple-coupon ticket issued for a multiple-segment PNR:
- When a segment is cancelled, if a Cancellation or No-Show charge is applied, the original ticket (for example ticket 5000000001) is automatically exchanged to a new ticket (eg. ticket 5000000002) for the remaining active segment(s). The value of the cancelled coupon is exchanged to a residual EMD. That residual EMD is then exchanged to:
- an EMD for the Cancellation or No-Show charge, and
- an EMD for the residual amount (which is the value of the cancelled ticket coupon less the Cancellation/No-Show charge).
- If the value of the residual EMD can be used to cover the Cancellation/No-Show charge for the next cancelled segment (if any) then it will be exchanged to an EMD for that Cancellation/No-Show charge and another EMD for the remaining amount. In this case, the ticket that was exchanged from the original ticket (i.e. ticket 5000000002) remains unchanged.
- When you refund the payment, the status for the residual EMD(s) is then moved to the "Refunded", and the open ticket(s) in the reservation are also moved to the "Refunded" status.
- When a segment is cancelled, if a Cancellation or No-Show charge is applied, the original ticket (for example ticket 5000000001) is automatically exchanged to a new ticket (eg. ticket 5000000002) for the remaining active segment(s). The value of the cancelled coupon is exchanged to a residual EMD. That residual EMD is then exchanged to:
Refund before cancelling the segment(s):
If you refund before cancelling the segment(s)
- For full refund, the status of the ticket coupons is moved to "Refunded", regardless of whether you added a penalty charge (such as Cancellation, or No-Show, or Refund penalty) before refunding or not.
- For partial refund, the ticket is exchanged to an EMD for the refunded amount, and another residual EMD for the ticket value less the refunded amount.
- In order to issue EMD for Cancellation/No-Show/Refund penalty, the below steps should be followed:
- Add the charge item for Cancellation or No-Show or Refund penalty to the reservation.
- Make payment for the charge. The EMD will be issued and immediately moved to the "Flown" status (see Note).
- Refund the payment associated to the ticket(s). The ticket(s) will be moved to the "Refunded" status
- Update the reservation as needed (cancel or update unused segment(s) or re-apply Hold Time etc).
NOTE: The charge added in Step 1 should be configured as "Consumed at Issuance" (by your control users in the Utilities>Charge Types and/or the Utilities>Charges screens ), and the Refundable box for that charge item is unchecked in the Reservation Charges screen
Amount to be refunded:
- All charges that have already been used cannot be refunded. For example, flown segment(s) or cancellation or modification charges that are "Consumed" cannot be refunded (This means the charges for ticket/EMD coupon(s) that have already been in the Flown status cannot be refunded).
- By default, the refunding amount in the Reservation Payment screen is equal to the value of the payment being refunded. However, when you click the S - Save button in the Reservation Payment screen, the system automatically calculates the maximum amount that is allowed to refund.
- The maximum refunding amount cannot exceeds the sum of the values of unused ticket coupons and EMD(s).
- Partial payment is allowed for only the users with the "Reservations > Operations > Booking > Partial Payment - Modify" permission (Note: only the users with that permission can modify the refunding amount to a value less than the maximum refunding amount and/or select the passenger(s) for whom the payment to be refunded)
Refer to the Refunding Payments section for the detail refunding steps.
Exchange ameliaRES Tickets and EMDs
Unused coupons in ameliaRES tickets and EMDs are automatically exchanged upon changes made to the reservation. The below table outlines the basic scenarios of ticket and EMD exchanges.
| Scenario | Ticket | EMD | Remarks |
|---|---|---|---|
| Change of Passenger Name | Exchanged | Exchanged | If a fee applied, the ticket/EMD are exchanged when the fee is fully paid for |
Change of flight number and/or date without changing fare and city pair | Revalidated | Exchanged | If a fee (eg. Rebooking fee) is applied, the ticket is revalidated at the time the fee is fully paid for |
| Change of segment involving at least a change other than flight number and date change | Exchanged | Exchanged | The ticket is exchanged when the additional charges/fees are fully paid for |
| Segment cancellation | Exchanged | Exchanged | See the Refunding ameliaRES tickets and EMDs section |
| Refund payment | Exchanged/Refunded | Exchanged/Refunded | See the Refunding ameliaRES tickets and EMDs section |
| Modification of fare/charge in the Charges screen | Exchanged | Exchanged | When a charge item associated to a ticket or EMD is modified, that ticket/EMD is exchanged |
Closing the Reservation
To close a reservation, simply click the C - Close button on the Passenger Reservation screen.
By default, the system will prompt the user for an access reason when closing the Passenger Reservation screen. Select a Default Reason and enter the Reason for Access. Click the O - OK button to complete the operation.

Figure 19: Reservation Access Reason screen
END OF DOCUMENT