4 - Flight Management
- Nicolas Maillet (Unlicensed)
- Curtis McGrath (Unlicensed)
Flight Management
The Flight Management area has several modules geared to flight-centric activities, such as building routes and schedules, tail assignment, flight status updates, and more.
Table 12: Flight Management Modules
| Module | Description |
|---|---|
| Route Management | Manage Flight Routes. |
| Flight Scheduling | Manage the Flight Schedule. |
| Flight Watch | Manage Flights in real-time. |
| Flight+ (Flight Plus) | Flight Watch, plus Crew and Passenger information. |
| Tail Scheduling | Assign tails to flights. |
| Dispatch Master Grid | Assign tails to flights, and other Dispatcher functions. |
| Planning Master Grid | Flight planning (based on Aircraft Models). |
Route Management, Flight Scheduling, Flight Watch, and Flight+ are the core Flight Management screens, and share some user-interface elements.

Figure 1: Controls shared by core Flight Managements screens
Table 13: Flight Management Shared Interface Descriptions
| Control | Description |
|---|---|
| Prev Mth | Use to switch the view to the previous month. |
| Curr Mth | Use to switch the view to the current month. |
| Next Mth | Use to switch the view to the next month. |
| Route | Use to switch to the Route Management module. |
| Flight Schd | Use to switch to the Flight Scheduling module. |
| Flight Watch | Use to switch to the Flight Watch module. |
| Flight+ | Use to switch to the Flight+ module. |
| From / To | Date range to use for the view. |
| A/C Model | Restrict the view to the specified Aircraft Model. |
| Edit Filter | Use to modify the filter (From, To, A/C Model) applied to the view. |
| Airport Local | Switches dates/times to the local time zone. |
| Zulu | Switches dates/times to Zulu (GMT time zone). |
TIP: In the core Flight Management screens, Show or Hide columns in the grid by selecting them from the context menu (right-click).
Route Management Screen
The Routes screen can be accessed from the menu (Operations -> Flight Management -> Routes), and allows you to maintain Route information, from which flight schedules will be built.

Figure 2: Route Management screen
Table 14: Route Management Screen Descriptions
| Control | Description |
|---|---|
| Add | Use to open the Add Route screen, where you can add a new route. |
| Edit | Use to open the Edit Route screen, where you can edit a route. |
| Delete | Use to delete a route. Permission is required to Delete - button is disabled if permission is not granted. |
| Roll | Allows you to roll a route up to a specified date. |
| Split Route | Allows you to split a route at a specified date, for future changes. |
| Build Sch | Automatically builds a flight schedule from the current routes. |
Add Route
To add a route, click the Add button on the Route Management screen. Enter the route number (Flight #), aircraft model, route type, date range, and operational days (days of the week), and click OK.

Figure 3: Add Route screen
You must now add the segments to this route. Click the Add button and enter the details in the Leg Information section, then click Save.

Figure 4: Add Route screen with Segment added
Edit Route
To edit a route, select it and click the Edit button on the Route Management screen. The Edit Route screen is similar to the Add Route screen, and allows you to make changes to the selected, existing route.
Build Flight Schedule
To build the flight schedule, click the Build Schd button on the Route Management screen. Schedules will be built for any routes that have been added or modified. If your system is configured to do so, the Apply Template screen will open and allow you to quickly apply a seat allocation template to the affected flights.
Roll Routes
If a route’s schedule has to be extended, or applied to another time period (ex: the same season the following year), you may choose to Roll it into a new date range. This saves time as there is no need to re-enter the route details. To Roll a route, simply click Roll on the Route Management screen, select the applicable routes, and click OK.
Split Route
If you plan to change route details (such as frequency or flight times), you can split the route from a specified date and make changes without affecting previous/existing flights on the route. To split a route, select it and click the Split Route button on the Route Management screen. Choose to split the route by date, or by frequency, and click OK.
Flight Scheduling Screen
The Flight Scheduling screen can be accessed from the menu (Operations -> Flight Management -> Flight Scheduling), and allows you to view, add, or edit flight scheduling details.

Figure 5: Flight Scheduling screen
Add Scheduled Flight
To add a single flight (for charters or special events, for example), click the Add button on the Flight Scheduling screen, which opens the Add Scheduled Flight screen (similar to the Add Route screen).
If your system is configured to do so, the Apply Template screen will open and allow you to quickly apply a seat allocation template to the new flight.
Edit Scheduled Flight
To edit a flight, select it and click the Edit button on the Flight Scheduling screen. This opens the Edit Scheduled Flight screen (similar to the Edit Route screen), which allows you to change flight details.
Roll Scheduled Flight
To Roll a flight’s schedule (extend it or apply it to another time period), select the flight and click the Roll button on the Flight Scheduling screen.
Flight Watch Screen
The Flight Watch screen can be accessed from the menu (Operations -> Flight Management -> Flight Watch), and allows you to view, and edit flights at a leg level. You can also track flights and update their status (departure, arrival, delays, etc).
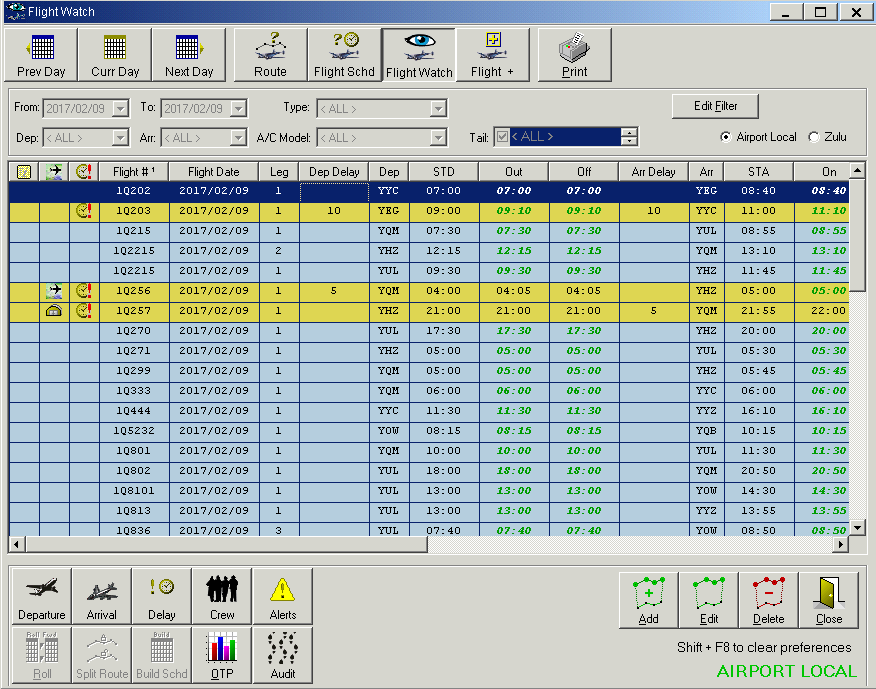
Figure 6: Flight Watch screen
Table 15: Flight Watch Screen Descriptions
| Control | Description |
|---|---|
| Departure | Use to open the Departure screen, where you can set departure time, location, tail, and delay code. |
| Arrival | Use to open the Arrival screen, where you can set the arrival time, location, and delay code. |
| Delay | Use to open the Flight Delay screen, where you can add flight delays. |
| Crew | Use to open the Crew Assignments screen, where you can view the assigned crew. |
| Alerts | Use to open the Flight Watch Alerts screen, where you see and handle flight watch alerts. |
| Audit | Use to open the Audit screen, where you can view a change history for the selected flight. |
Flight Departure
To set the departure information for a flight (when it departs), select the flight and click the Departure button on the Flight Watch screen. This opens the Flight Departure screen, where you can set the tail, location (Departed), departure time, and delay code (if necessary). Note that the date is displayed next to each time value - these are automatically set, but can be overridden (+/- 1 day) using the - and + buttons.

Figure 7: Flight Watch - Departure screen
Flight Arrival
To set the arrival information for a flight (when it arrives), select the flight and click the Arrival button on the Flight Watch screen. This opens the Flight Arrival screen, where you can set the tail, location (Arrived), arrival time, and delay code (if necessary). Note that the date is displayed next to each time value - these are automatically set, but can be overridden (+/- 1 day) using the - and + buttons.

Figure 8: Flight Watch - Arrival screen
Delay Screen
Select a flight and click the Delay button on the Flight Watch screen to open the Flight Delay screen, where you can add, edit, or deactivate flight delays.

Figure 9: Flight Delay screen
Add Flight (Flight Watch)
To add a flight to Flight Watch, simply click the Add button on the Flight Watch screen. Enter the appropriate flight information (flight number, date, city pair, flight time (first leg)) on the Add Flight (Flight Watch) screen. You can also add secondary information, such as A/C Model, tail, location, and status. Click the Save button to complete the operation.
Edit Flight (Flight Watch)
To edit a flight in Flight Watch, select the flight and click the Edit button on the Flight Watch screen. Change the necessary flight information on the Edit Flight (Flight Watch) screen. You can also modify delays, flight notes, and crew assignments. Click the Save button to complete the operation.

Figure 10: Flight Watch -Edit screen
Flight+ (Flight Plus)
The Flight+ screen is similar to the Flight Watch screen, but also allows you to view the associated Crew and passengers. The Crew tab has additional crew-related functions, and allows you to filter the crew listing based on flight requirements.

Figure 11: Flight+ screen
Assign Crew Member (Flight+)
On the Flight+ screen, you can assign a crew member to a flight via drag & drop. Simply take the crew member from the bottom of the screen, and drag it onto a flight in the grid above. The assigned regulation limitation will automatically be checked, and you will be notified of any rules that may be broken. To un-assign a crew member, simply right click on the cell in the flight grid, select the desired crew member, and click Delete or double-click on the crew member’s name.
You can choose which position(s) you wish to have visible in the main grid using the Filter Crew options. The Crew tab is enabled only when you have an A/C Model selected as one of your filters. The selected position(s) will be saved to your profile; and used to fill the Crew Tab grid using one of the three options. These criteria help you to determine who is available to round out your crew, if need be:
Qualified: This option fills the crew grid with all crew who have the chosen endorsements for the A/C model.
Free: This option fills the crew grid with all crew that have the chosen endorsement for the A/C model and are not already assigned an event during the selected flight’s flying time.
- Reserve: This option fills the crew grid with all crew that have the chosen endorsement for the A/C model and have been assigned a “Reserve” event during the selected flight’s flying time.
Tail Scheduling
The Tail Scheduling screen can be accessed from the menu (Operations -> Flight Management -> Tail Scheduling), and allows you to quickly assign tails to flights. Flights and Tails are displayed on a Gantt-type chart for easy visualization of the tail schedule. Tail Scheduling operations are performed using drag & drop and context menu (right-click) actions.
Flights in the Gantt chart are color-coded by type:
FS: Scheduled Flight
FW: Flight created in Flight Watch
DEP: Departed Flight
ARR: Arrived Flight
NF: Non-flying event

TIP: Hover the mouse pointer over an assigned flight in the Gantt chart to view additional detail.
Adding Assignments
To assign a tail to a flight on the Tail Scheduling screen, click the desired tail in the Gantt chart (it will become yellow), select the flight from the dropdown, and click the Assign Flight button. You can assign special events (such as Maintenance) in a similar fashion, using the Assign Event button.
Removing Assignments
To remove an assignment on the Tail Scheduling screen, right-click on it, and select UnAssign from the context menu. Click Yes to confirm the operation.
Options
The Tail Scheduling screen has an Options menu that you can use to change the colors used, visibility options, and default actions.
Dispatch Master Grid
The Dispatch Master Grid screen can be accessed from the menu (Operations -> Flight Management -> Dispatch Master Grid), and has the same core features as the Tail Scheduling screen. It allows Flight Dispatchers to select a Date, A/C Model, Tail(s), and Flight Type in order to view and action flights in the grid. The grid itself displays time as rows and tails as columns. All unassigned flights (no Tail assigned) appear in a dropdown (near the bottom of the form), so the user can easily select a tail for a flight.
The Dispatch Master Grid also provides quick access to Dispatch Notes and Radio Logs. As on the Tail Scheduling screen, operations are performed using drag & drop and context menu (right-click) actions.

Figure 13: Dispatch Master Grid screen
Radio Logs
The Radio Logs form allows the user to view and log all communications between the aircraft and dispatcher. The log holds the time, flight number and notes involved in communications throughout the day. These radio logs can be displayed at any time from the Dispatch Master Grid screen by selecting the flight, and clicking the Radio Logs button.
Dispatch Notes
Dispatch Notes are available for the user to record general notes for the day or for the next shift. To open the Dispatch Notes screen, simply click the Dispatch Notes button on the Dispatch Master Grid screen.
Planning Master Grid
The Planning Master Grid screen can be accessed from the menu (Operations -> Flight Management -> Planning Master Grid), and is a companion to the Flight Scheduling module. It allows you to plan scheduled and charter flights based on aircraft model. All scheduled flights without a Tail assigned can be shown in one (A/C Model) column - these flights can then be assigned a Tail quickly, with one group action.
The grid itself displays time as rows and A/C Models as columns. You may drag & drop a flight block between A/C models - you will be prompted to adjust allocations and crew assignments, when necessary.
Flights in the Gantt chart are color coded by type:
FS: Scheduled Flight
FW: Flight created in Flight Watch
CR: Crew Assigned (read-only)

Flight Auto-Assign
In addition to populating the Planning Master Grid with flights from the unassigned flights dropdown, you may use the Flight Auto-Assign function to automate this, after specifying a few settings. You can select a date range and populate the grid in bulk - flights that remain unassigned will stay in the dropdown for your action.
To use the Flight Auto-Assign function, you must supply some parameters on its settings screen (Options -> Flight Auto-Assign Settings). Access the Flight Auto-Assign screen (Options -> Flight Auto-Assign), select a date range, and click Apply to complete the operation.

Figure 15: Flight Auto-Assign Settings screen
Grid User Preferences
Set your preferences for the Planning Master Grid from the menu (Options -> Grid Preferences). You can set the time range (start and end time of day), interval (time represented by each row), background and font colors used, and width and height of grid cells (useful to maximize viewable content / minimize scrolling).

Figure 16: Grid User Preferences screen (Planning Master Grid)
Grid Settings
Grid configuration (data displayed in flight/event cells) for the Planning Master Grid can be changed from the Master Grid Configuration screen (Options -> Grid Settings).
The amount of information displayed depends on flight/event duration and interval in use. The example in Figure 7.15 displays up to 5 pieces of data, in addition to the flight number, for each flight/event. The following are the elements you may select to display in the grid cells:
Flight Number
ETD
ETA
ETD - ETA
DEP
ARR
DEP - ARR (passenger count)
Crew Position (1 per defined crew pos): crew member initials
Fuel Weight
Enplane Count
Deplane Count
- Passenger Count

Figure 17: Master Grid Configuration screen
END OF DOCUMENT